Содержание
A Number of users report Windows 10 won’t boot properly after October 2018 upgrade. it starts to load but Windows 10 stuck “preparing automatic repair” or Diagnosing phase for hours then states that startup could not be repaired. Also sometime you may notice due to power failure or after an improper shutdown, Windows 10 stuck on preparing automatic repair. This problem mostly occurs because of corrupted, missing system files, Windows boot mgr corrupted itself or an installed device driver not compatible with current Windows 10 version.
If your PC has entered this state “windows 10 stuck on preparing automatic repair” or windows 10 stuck on loading screen Here some solutions to get rid of this.
Windows 10 preparing automatic repair
Disconnect all the devices connected to the computer except keyboard and mouse and check if you are able to boot to the start screen.
As due to this problem windows fails to start normally, we need a Windows 10 installation media to go with the next steps. If you don’t have check how to create windows 10 Bootable UBS/DVD here.
Repair MBR and Rebuild the BCD
- Insert bootable media to your pc or computer and Restart your computer.
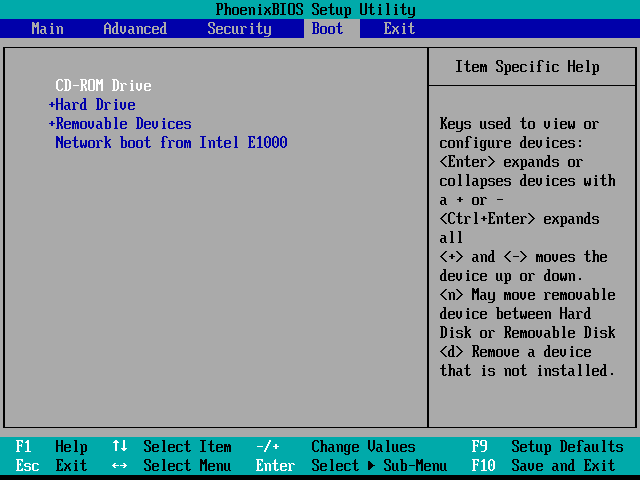
- Enter your computer’s BIOS (or UEFI) adjustments the moment it starts up.
- Under boot options change first boot CD/DVD (Removable Disk)
- Press F10 to save changes and restart windows.
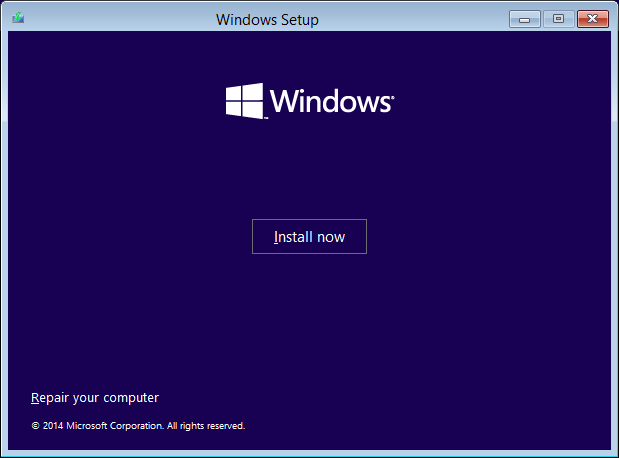
- While reboot press any key to boot from CD/DVD.
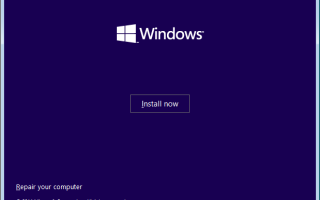
- When you see the Install Windows screen, click the link “Repair Your Computer” at the bottom left:
- In the screen titled Choose an option, pick the Troubleshoot item.
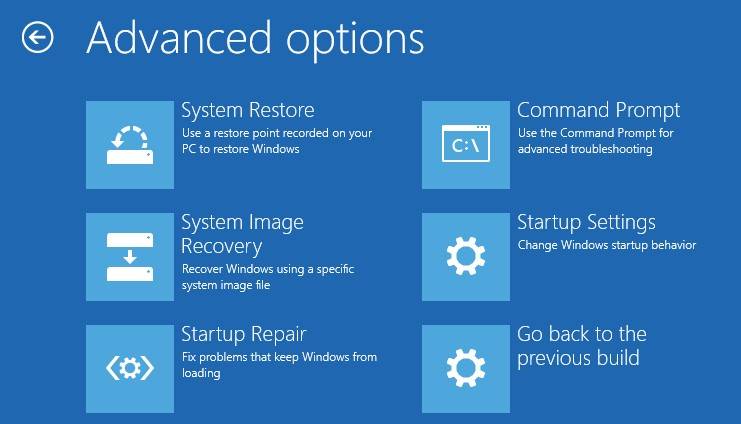
- On the next screen, select “Advanced Options”.
- In the Advanced Options screen, pick the item named “Command Prompt”.
Here on the advanced command prompt enter the following commands and press Enter after each line in order to run it:
- bootrec.exe /rebuildbcd
- bootrec.exe /fixmbr
- bootrec.exe /fixboot
Also after performing this commands you need to run additional chkdsk commands as well. To perform these commands, you need to know drive letters for all your hard drive partitions.
- chkdsk /r c:
- chkdsk /r d:
This is just our example, so keep in mind that you have to perform chkdsk command for every hard drive partition that you have. After complete 100% scanning Restart your computer and check if the issue is resolved.
 Как увеличить диск D в Windows 10 и 7. Да можно и любой другой попробовать
Boot Into safe mode
If the computer fails to boot, try performing safe mode and perform clean boot.
Start (or boot) your computer from the installation media. Insert the DVD or USB flash drive and restart your computer and again access advanced options.
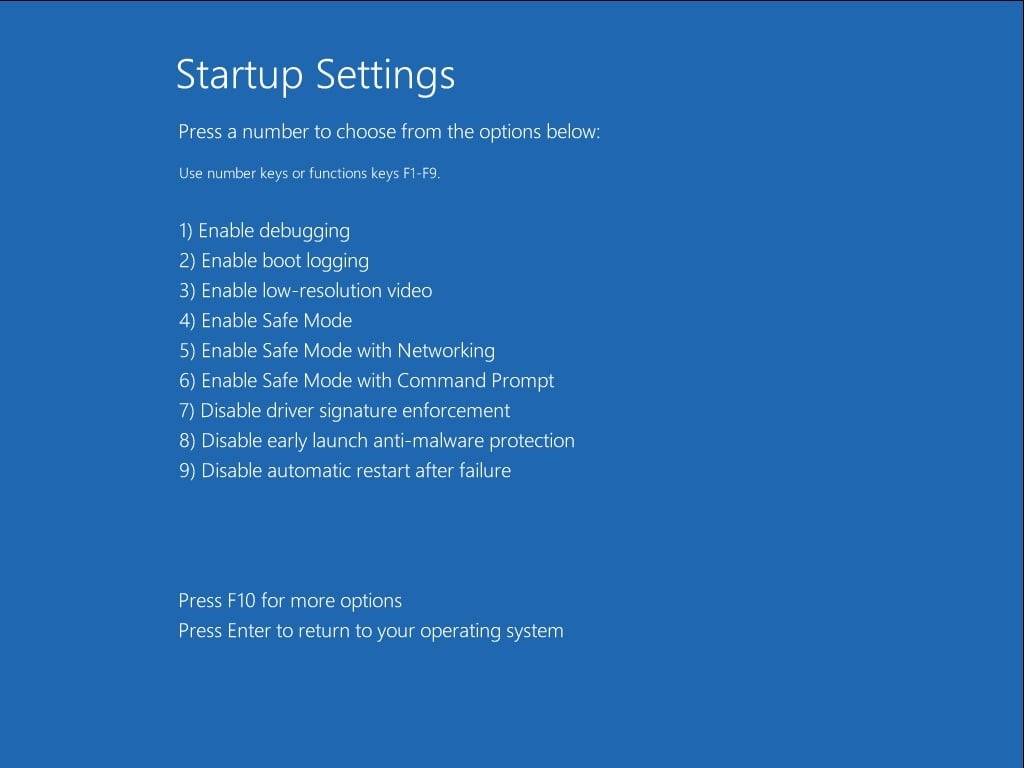
click on Startup Settings, Click on Restart and choose Safe mode with Networking or Low resolution.
Update/Reinstall Display driver
Now when windows start on safe mode with minimum system requirements. I would suggest you update the latest driver for display adapter in Device Manager, this would fix the problem for you.
- Press Windows Key + R, type devmgmt.msc and ok.
- Expand Display Adapter.
- Right click on the driver and click on Update driver software.
Note: We need a Wired Internet Connection to update drivers in safe mode. You may try selecting Low Resolution option if there is not wired internet connection on your Computer. Try to update all the device drivers if possible.
Run DISM Command
Corrupted, missing system files are the main reason behind, Windows 10 preparing automatic repair. Run build in DISM and SFC command that scan and restore missing system files with correct one from a compressed folder located %WinDir%System32dllcache.
- Type cmd on start menu search,
- Right click on command prompt and select run as administrator,
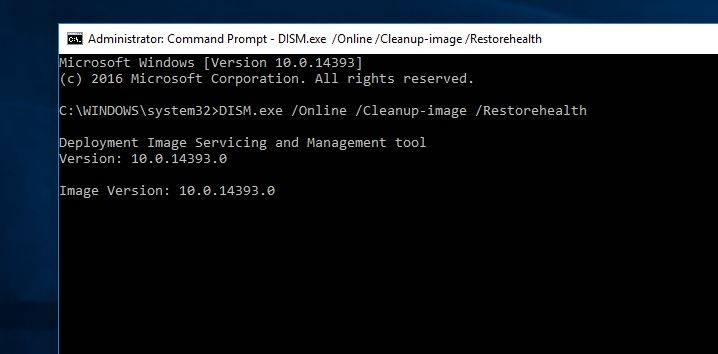
- Then perform DISM (Deployment Image Servicing and Management )command below.
DISM /Online /Cleanup-Image /RestoreHealth
 Расширение дискового раздела в ОС Windows 10
- It might take about 15 or more minutes for this process to complete, so be patient. Do not interrupt it.
- After complete the scanning process type sfc /scannow and ok.
- Wait until 100% complete the scanning process.
- Restart windows and check this time system starts normally.
Disable Automatic Repair on Startup
After performing Above method still getting same problem then disable the Automatic Repair will help. You can do this with same way by perform a simple command. To do this access Advanced command prompt and type bellow command.
bcdedit /set {GUID} recoveryenabled No
After type this hit enter to execute the command and restart windows check problem fixed. Still getting the Same problem fallow next troubleshooting step.
Restore Windows registry
Also Some times Due to different application installation or uninstallation windows registry may get corrupted and this will cause different problems while windows start, windows stuck at repair screen or“Windows 10 Automatic Repair couldn’t repair your PC”. You can fix this by restoring your registry from RegBack directory To this fallow below steps.
First Access Command Prompt using advanced boot options, Here In Command Prompt, enter the following and press Enter to execute this.
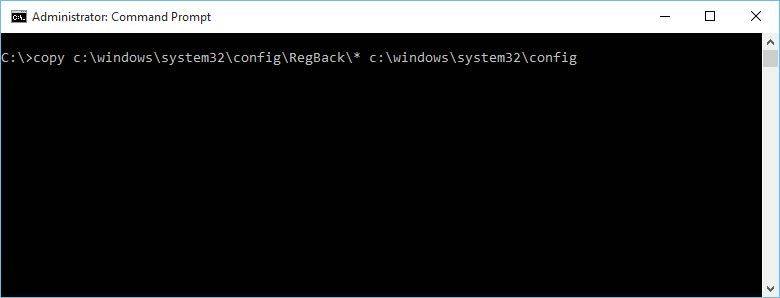
If you get asked to overwrite files, type All and press Enter, Now type exit and press Enter to exit Command Prompt. Simply Restart your computer and check if the issue has been resolved.
Check device partition and os device partition
Also if the device partition and OS device partition values aren’t correct this will cause this problem. Start Command Prompt from Advanced boot options and Enter the following command and press Enter:
bcdedit
 How To Turn Off Windows 10 Updates Permanently.
Find device partition and osdevice partition values and make sure that they are set to correct partition.
On our device, the default and correct value is C: but this can change for some reason to D: (or some other letter) and create problems.
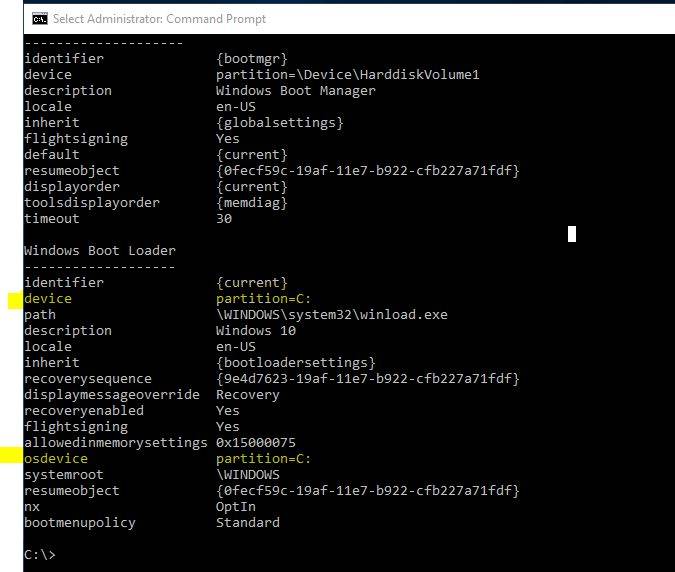 If the value isn’t set to C: enter the following commands and press Enter after each one:
- bcdedit /set {default} osdevice partition=c:
By default it should be C: but if your Windows 10 is installed on a different partition, make sure that you use that partition’s letter instead of C. Restart your computer and check if the issue has been resolved.
Refresh or Reset Windows 10
If after performing all the above steps still, the problem persists, Then the last way to refresh or reset windows which help windows to get a fresh start. Note By doing this, your installed applications will be removed but your installed Universal apps and settings will be saved if you choose the Refresh option. On the other hand, the Reset option will delete all installed files, settings and apps. If you decide to take this step, it’s advised that you backup your important files.

Did these solutions help to fix windows 10 preparing automatic repair black screen? Let us know on comments below, Also read:
![]() Continue Reading
Continue Reading
Хотя операционную систему Windows 10 постоянно усовершенствуют и шлифуют, она все еще содержит большее число ошибок, чем в предыдущих версиях. Например, пользователь может столкнуться с проблемой при загрузке операционной системы: на экране загрузки появится надпись «Preparing Automatic Repair», но никакого восстановления не происходит, а Windows 10 не запускается. Что делать в таком случае, читайте в рамках этой статьи.
Об ошибке
Preparing Automatic Repair (подготовка автоматического восстановления) возникает в том случае, если по каким-то причинам Windows 10 повреждена. По сути, функция «подготовки» должна восстановить поврежденные файлы из сохраненных точек восстановления или установочных файлов Windows на подключенном внешнем носителе. Но за неимением таковых окно просто зависает и через некоторое время, происходит перезагрузка. И цикл повторяется заново, превращаясь в замкнутую петлю. Разорвите петлю, отключив на время питание и ознакомьтесь с инструкцией по исправлению.
Как исправить?
Есть несколько действенных советов устранения этой проблемы.
Включение XD-bit в BIOS
До тех пор пока функция XD-bit (также известная как No-Execute Memory Protect) выключена в настройках BIOS (UEFI), пользователь сталкивается с петлей Preparing Automatic Repair.
Полная инструкция
В избранноеПожаловатьсяПросмотров: 17140 Комментарии3
Автоматический восстановление при загрузке Windows 8/10 -подробное описание.
Startup Repair или Automatic Repair — это одна и та же утилита восстановления Windows, но по-разному названная в соответствии с версией Windows. Таким образом, в Windows Vista и Windows 7 он называется «Startup Repair», а в Windows 8 он называется «Automatic Repair», а в Windows 10 он снова называется «Startup Repair».
Это статья предназначена для Windows 10 и Windows 8, если вам нужно восстановление запуска windows 7 или Vista, >> Нажмите здесь <<
Итак, теперь вопросы, которые мы обычно задаем:
- Что это такое: восстановление запуска windows 10 ?
Обе функции одинаковы, и это очень полезный и эффективный инструмент для восстановления Windows. Основная работа этой функции заключается в том, чтобы восстановить Windows, когда что-то мешает запуску операционной системы.
- Что «Восстановление при запуске» или «Автоматический ремонт» на самом деле делает в Windows?
Startup или Automatic Repair — это единственный инструмент восстановления, который у вас есть, так как Windows, требующий немедленного восстановления, запускают именно его. Этот инструмент предназначен для восстановления только определенных глюков, таких как отсутствующие или поврежденные системные файлы, которые в основном использовались для загрузки операционной системы Windows.
- Почему «Восстановление при загрузке» или «Автоматический ремонт» пишет «не удается исправить«?
Действительно, эта функция не может показать вам, что создает проблему для запуска windows. Она не поможет вам восстановить личные файлы и документы. Она также не может обнаруживать или устранять аппаратные сбои и не помогает в борьбе с вирусными атаками и их повреждениями.
Как использовать «Восстановление при загрузке» и «Автоматический ремонт»?
Когда вы включите свой компьютер, и он отобразит экран вашего логотипа BIOS, быстро нажмите клавишу «Shift» и несколько раз нажмите клавишу F8.
Это может не сработать с первого раза. Просто перезагрузите компьютер и попробуйте еще раз.В итоге Вы попадете в режим восстановления, и вы увидите следующий шаг, описанный ниже.
Если вы не можете открыть его клавишами Shift и F8, единственная возможность, это использовать Windows Disc или Windows USB Pendrive. Также это поможет если не запускается windows 7 восстановление запуска.
Чтобы открыть автозагрузку или автоматический ремонт с диска Windows:
Используйте только загрузочный диск,соответствующий Вашей текущей операционной системе. Например, используйте установочный диск Windows 8, если вы установили Windows 8 на свой компьютер. Используете установочный диск Windows 10, если вы используете Windows 10.
Во-первых, вам нужно будет загрузить ваш диск или флешку Windows, с помощью приоритета последовательности загрузки. Если вы не знаете, как это сделать, перейдите по ссылке ниже. восстановление запуска windows 7 через командную строку (win 8/10):
Как изменить порядок загрузки (Boot Sequence) в BIOS?
- Сразу после того, как загрузка была завершена, вы сможете увидеть первый пункт меню настройки, и в этом вам нужно нажать «Далее», после чего нажмите «Восстановить компьютер», чтобы запустить функцию восстановления при запуске.
- После этого Вы увидите три варианта. Нужно будет выбрать второй, называемый «Устранение неполадок», а затем прямо под меню устранения неполадок выберите третий параметр «Дополнительныепараметры».
- Теперь выберите ремонт при запуске Windows 10 или «Автоматический ремонт» в Windows 8 для восстановления компьютера.
Используемые источники:
- https://windows101tricks.com/windows-10-stuck-preparing-automatic-repair/
- https://subscribe.ru/group/pomosch-windows/12553245/
- https://comp4all.online/windows-7/startup-repair-win8-10.html
 Apple Mobile Device USB Drivers v.1.8.5.1 Windows XP / Vista / 7 / 8 32-64 bits
 6 вариантов отключения Secure Boot на разных системах и моделях ноутбуков
 Как установить Windows 10 на Mac: 2 способа и советы по настройке