Содержание
- 1 Option 1. Disable the Windows Update Service
- 2 Option 2. Set Up a Metered Connection
- 3 Option 3. Group Policy Editor
- 4 Why Would I Need to Know How to Disable Windows 10 Updates?
- 5 Stopping Windows 10 from Updating Automatically
- 6 Pause updates for up to 35 days
- 7 Pause feature updates for up to 365 days
- 8 Use Group Policy to disable Windows Update
- 9 Disable updates via Registry
- 10 Disable Windows Update service permanently
- 11 Use Windows Update Disabler
- 12 Change your network type to Metered
One of the controversial features of Windows 10 is a new way that the operating system handles updates. Cumulative updates are installed automatically when Windows decides to do it. This can be extremely frustrating for Windows 10 users as they are often forced to restart their machine at an inopportune time.
Before proceeding, remember that some of the automatic updates will be security updates or important stability improvements that you will want to have installed on your system. Keep this in mind if you choose to keep automatic updates turned off for an extended period of time.
One option which we will not look at in depth is to make registry changes to your Windows operating system to disable automatic updates. This is a dangerous procedure and should only be taken by experienced users who have taken a full backup of their machine before attempting the registry changes. Mistakes during this process can have serious negative effects on your computer and its performance.
Option 1. Disable the Windows Update Service
Windows Update is essentially just another Windows Service and can be turned off in a similar manner to other services.
Follow these steps to stop Windows 10 updates:
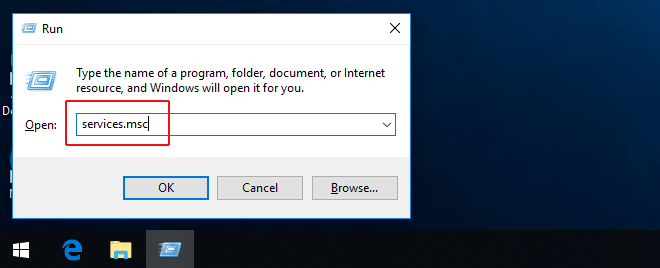
- Fire up the Run command (Win + R). Type in “services.msc” and hit Enter.

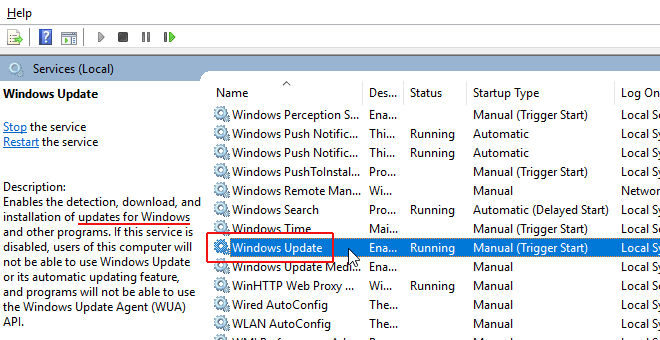
- Select the Windows Update service from the Services list.

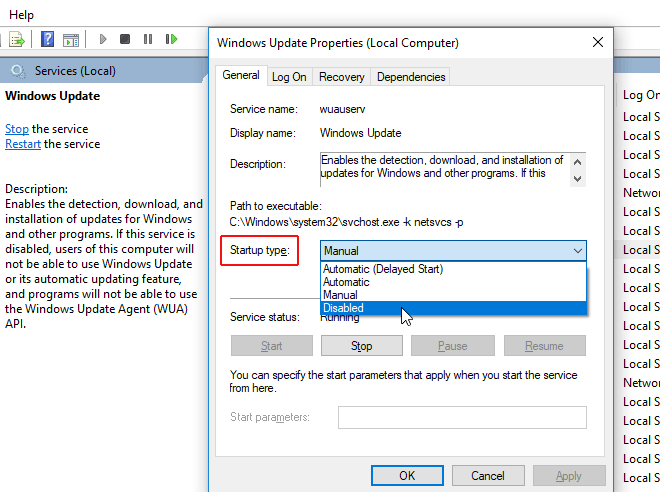
- Click on the “General” tab and change the “Startup Type” to “Disabled”.

- Restart your machine.
When you want to re-enable automatic updates you just follow the same procedure except you select “Automatic” when choosing the “Startup Type”.
Option 2. Set Up a Metered Connection
If you are using WiFi to connect your Windows 10 machine to the Internet, you have the option of setting up a metered connection. In a metered connection, bandwidth is conserved by only automatically downloading and installing priority updates.
Microsoft’s method of classification may remain a mystery, but driver and software feature updates that may cause stability problems are minimized by opting for this option for stopping Windows 10 automatic updates.
To disable Windows 10 updates:
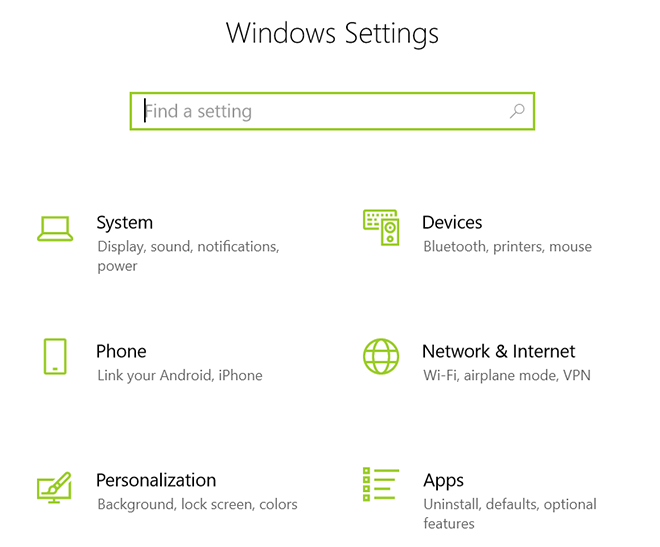
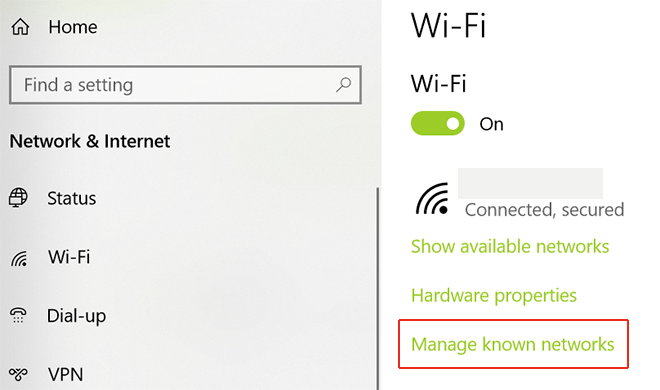
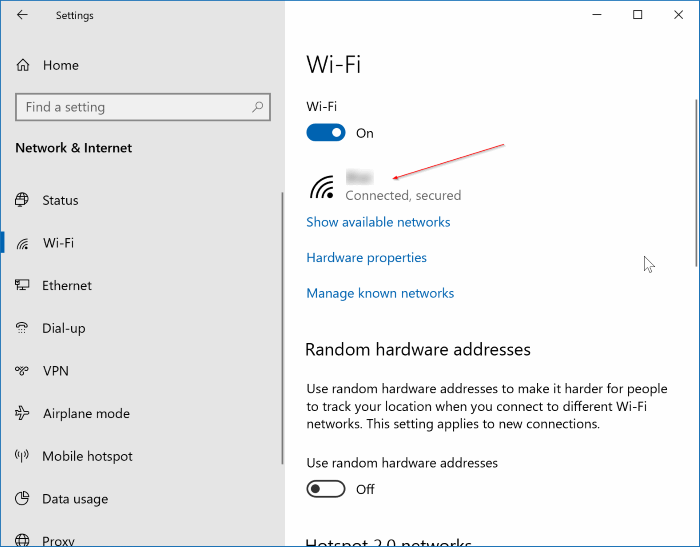
- Open the Windows Settings application (Win + I).

- Click on the ‘Network & Internet’ section.

- Open ‘Wi-Fi’ and click the ‘Manage known networks’.

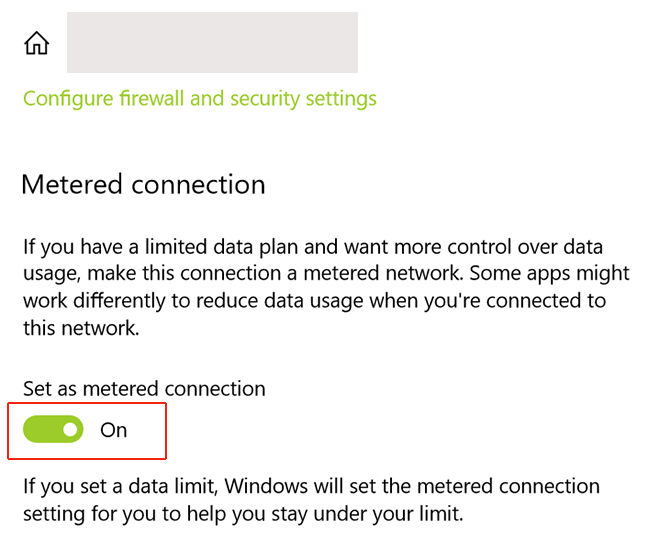
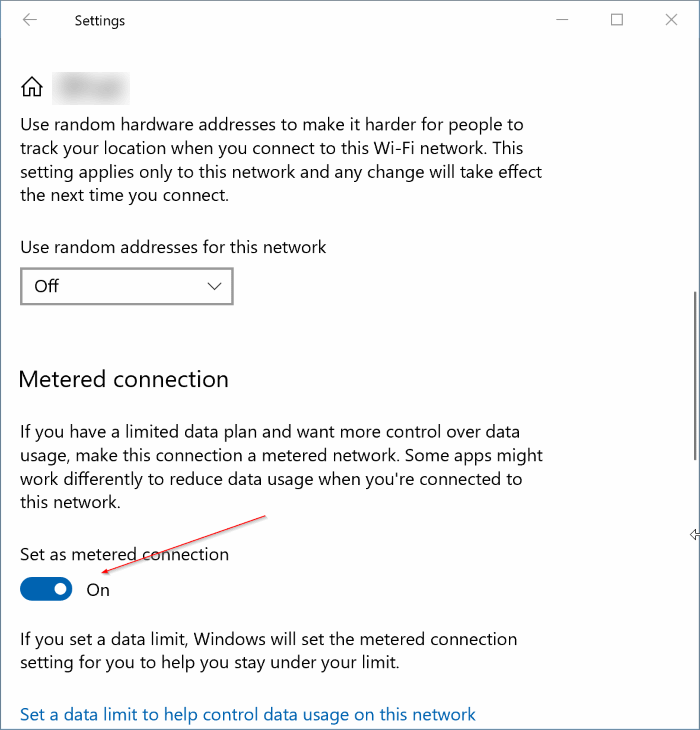
- Select network and in ‘Properties‘ toggle the ‘Set as metered connection’ option to ‘On’.


For some reason, Microsoft only offers this option if you are using a WiFi connection. If you connect to the Internet through an Ethernet cable you will not be able to set up a metered connection.
 Сетевые драйверы v.21.0 для Intel Network Adapter Driver Windows 7 / 8 / 8.1 / 10
Option 3. Group Policy Editor
You can make changes to the Group Policy Editor if you are using Windows 10 Education, Pro or Enterprise editions. Users of Windows 10 Home edition are out of luck regarding this way of disabling Windows 10 updates.
If you opt for this solution, security updates will still be installed automatically. For all other updates, you will be notified that they are available and can install them at your convenience. This is the way Windows update worked in the past. Today, Microsoft wants to eliminate the need for novice users to engage in updates, but it has enforced this at the cost of flexibility for more experienced users.
Here’s how to update your Group Policy Editor to prevent automatic Windows 10 updates:
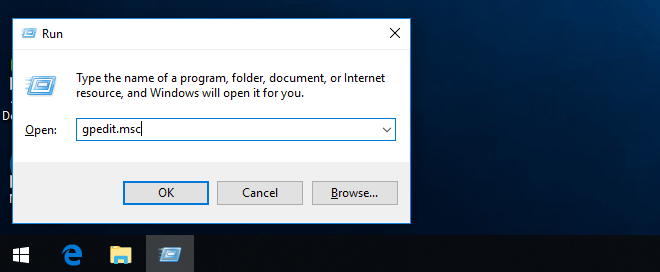
- Launch the Run command (Win + R). Type in “gpedit.msc” and hit Enter to open the group policy editor.

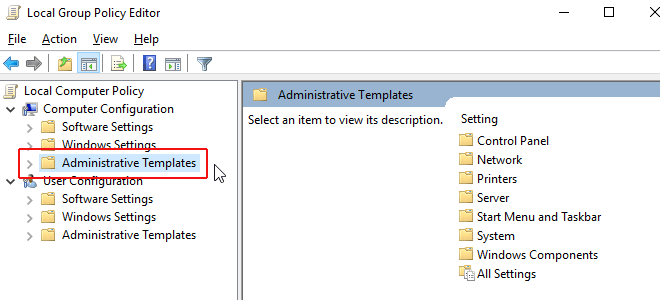
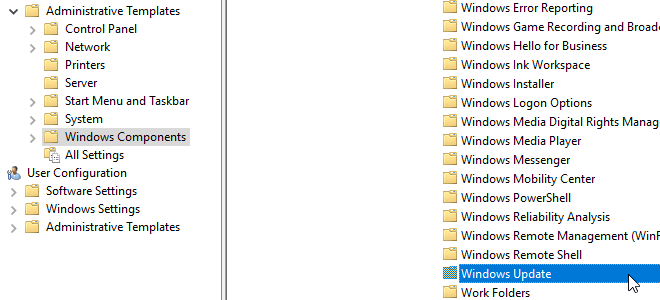
- Drill down through “Computer Configuration” to “Administrative Templates”.

- Select “Windows Components” and then “Windows Update”.
- Choose the option on the right to “Configure Automatic Updates.”

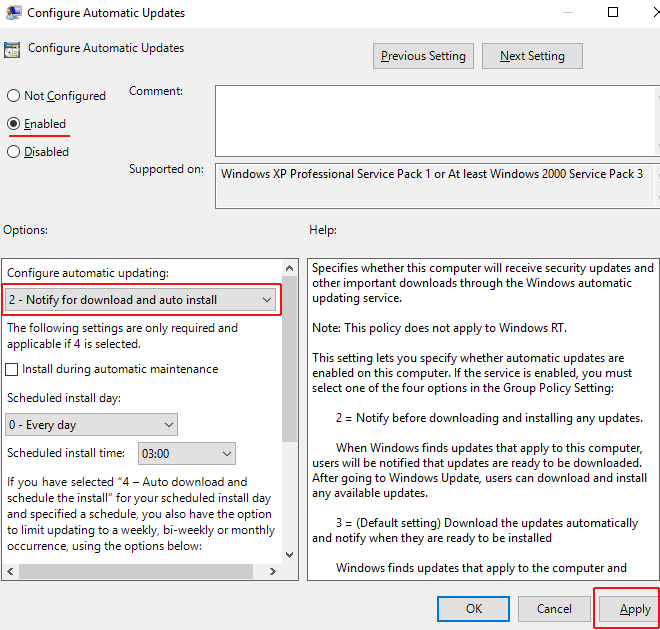
- Select the option that indicates “Notify for download and auto install”.

- Click “Apply” and “OK”.
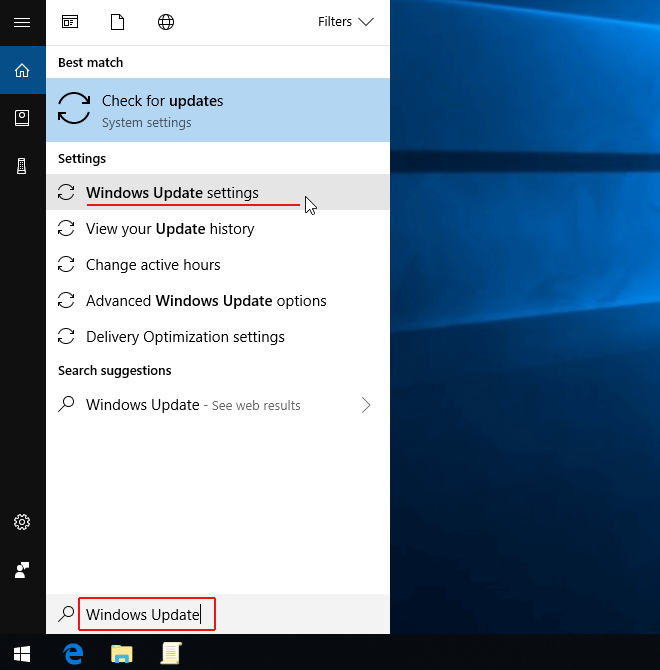
- Type “Windows Update” into the Start menu and select “Windows Update Settings.”

- Restart your computer to finish updating the group policy editor.
- Check for updates. You should be notified by Windows if it finds them but they should not be automatically installed any longer.


From this point forward Windows should notify you that updates are available and it is your responsibility to make sure that they get downloaded and installed.
Why Would I Need to Know How to Disable Windows 10 Updates?
Operating system, driver, and application updates can often lead to unexpected behavior on the computer on which they are installed. One way to protect yourself and your machine from unanticipated problems is to perform a backup before installing updates to your system.
Unfortunately, when automatic updates are being installed without your approval, you cannot take this precautionary step and face the possibility of having to resort to an older backup if you need to go back past the update.
Many updates need to reboot your machine when complete and certainly take up bandwidth while downloading. This can lead to slower response time and unforeseen reboots that can cause havoc with your work life.
So there are indeed valid reasons to turn off automatic updates in Windows 10. Just be careful not to turn the service off and forget to check for updates. While automatic updates can be problematic, letting your system lag behind critical updates can also have serious consequences.
For some reason Microsoft decided to remove the option to turn Automatic Updates On of Off in Windows 10. Hence, Windows 10 will start downloading the updates on any connection as long as it is not marked Metered. Whilst its good for a lot of the users who have speedy connections, the ones with slow broadband connections suffer because Windows Update takes most out of the little speed that their connection offers. This results in slow browsing and even slower downloads. So here’s how to turn off Automatic Updates in Windows 10 and save some bandwidth.
 Download official Windows 10 ISO file without Media Creation Tool
Stopping Windows 10 from Updating Automatically
There are two alternative ways to turn off the Windows update. One where the updates are only stopped from automatically downloading and the other where they are entirely disabled and a manual check won’t work either. First one is preferred.
Method 1 – Disable Automatic Downloading of Windows Updates
Just a note, while you can follow the steps below to disable Windows Update, be sure to still run it manually once in a while (when PC is idle) and let the PC update. That’s because a lot of updates are important to keep Windows stable and running. Windows Update also brings security fixes and driver updates which can improve hardware compatibility.
If your PC is connected to internet via a WiFi connection, it is better to mark that particular connection as ‘Metered’ and Windows won’t update on such a connection.
- Type gpedit.msc in Start and press Enter key to open the Group Policy Editor. Alternatively, press + R, type gpedit.msc and hit Enter.
- In the left pane, navigate to: Computer Configuration> Administrative Template> Windows Components> Windows Update.
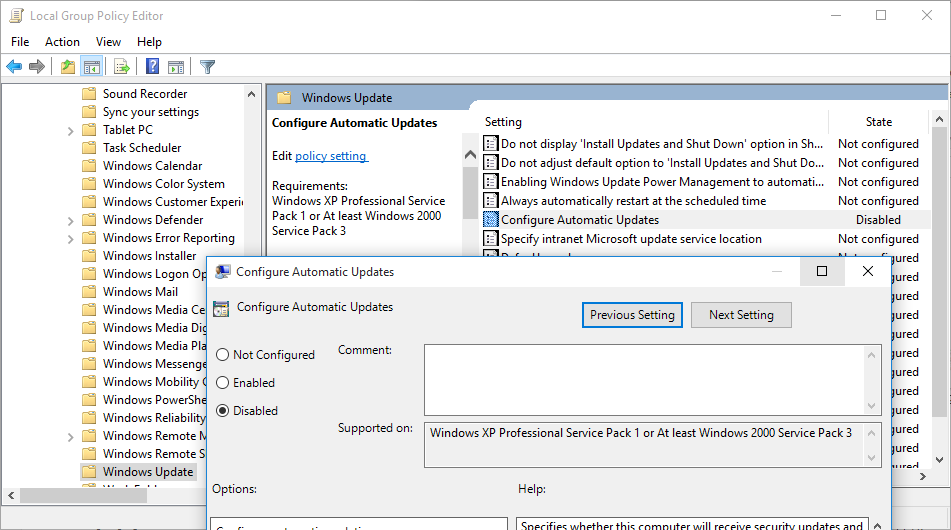
- Now in the right pane, double-click on Configure Automatic Updates.

Set to Disabled - Change the value from Not configured to Disabled and press OK.
From then onward, Windows will not automatically check for and download updates. The same will be reflected by a note on the Advanced settings page under Windows update settings.
Method 2: Disable both Automatic & Manual Updates
This method disables Windows Update entirely and you need to follow the steps mentioned in 2.1 below to make it work again.
- Open Run by pressing Windows Key + R. Alternatively, you can also right-click Start button and choose Run.
- Enter services.msc and hit Enter.
- In the Services window, locate service with the name Windows Update.
- Right click on Windows Update and choose Properties.
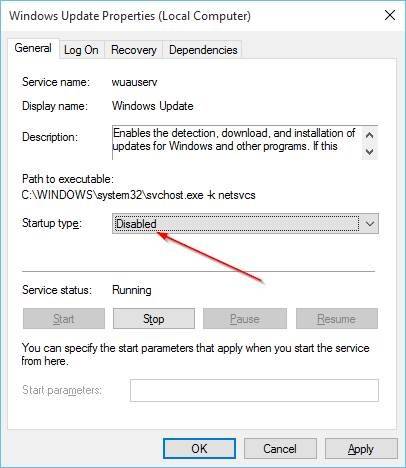
- Firstly stop the service by clicking the Stop button. Then change Startup type from Manual to Disabled.
- Click OK and you’re good to go. Windows will try to check for updates, but because the service is not running, it will go into an error state.
Error checking for Updates
2.1 Enabling Windows Updates Again
Because updates are important, you should turn on updates from time to time and update your PC to the latest. To turn Windows Update on:
- Follow steps 1 to 4 in the above procedure.
- Change Startup type from Disabled to Manual.
- Click OK.
- Go to Windows Update in PC Settings and press on Check for Updates and Windows will start installing updates.
Want to turn off or disable Windows Update in Windows 10? Here are thee ways to stop Windows 10 from automatically downloading updates or completely disable Windows Update in Windows 10.
It’s no secret that Microsoft has changed the expected location of many tools and components in Windows 10. Many of the settings have been moved from the classic Control Panel to the new Settings app, and during the process, some of the options have been completely left out.
In Windows 10, Windows Update settings have been moved from the classic Control Panel to the new Settings app. While the traditional Control Panel is still present in Windows 10 and we need to navigate to the classic Control Panel to access many of the settings, some of the familiar Windows Update settings have been completely removed.
 Create Windows 10 Bootable USB – Quickly and Easily
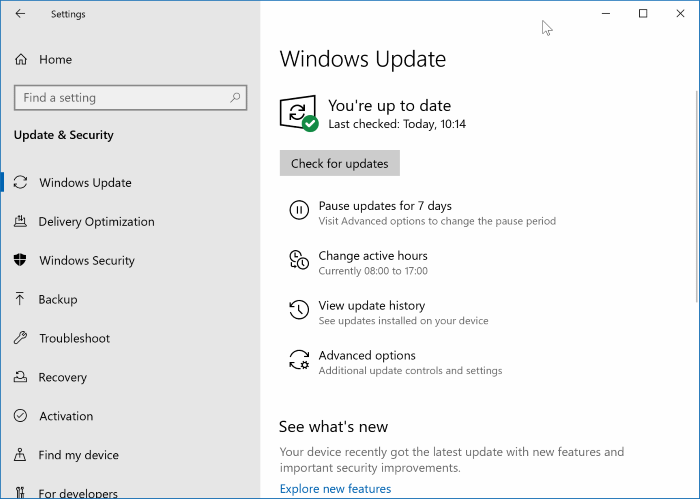
In previous Windows versions, we could choose what updates are downloaded and installed. In Windows 10, users have very little control over updates.
If, for whatever reason, you want to turn off or disable Windows Update in Windows 10, follow the given below workarounds.
Method 1 of 7
Pause updates for up to 35 days
Windows 10 lets you pause updates for up to 35 days. That is, you can temporarily pause updates with ease. However, once the 35-day limit is crossed, Windows 10 will have to install available updates before you pause updates again. Nevertheless, this is a good option if you want to stop updates for up to 35 days.
Step 1: Go Settings > Update & Security > Windows Update.
Step 2: On the right side, click Advanced options.
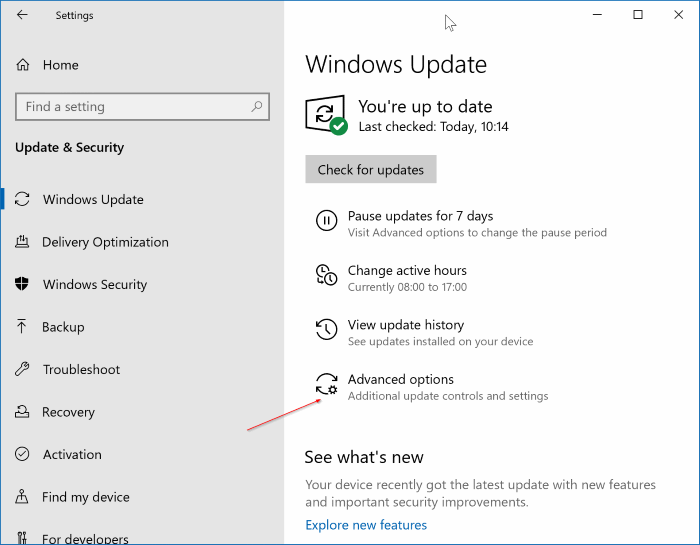
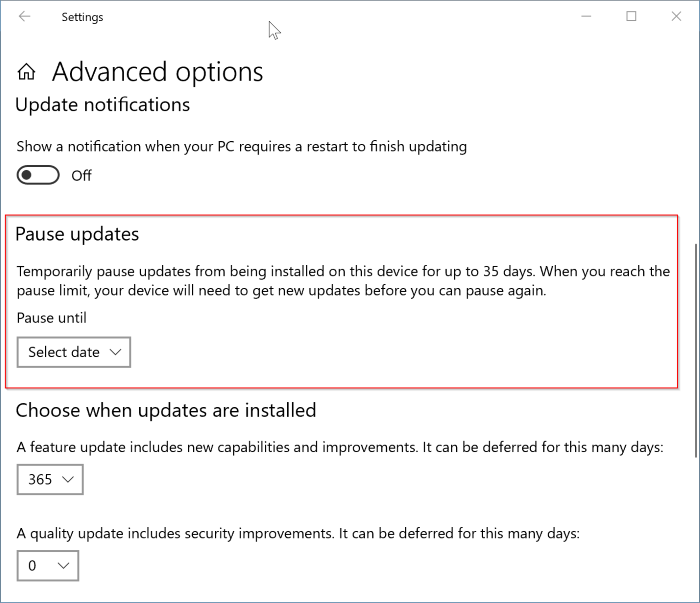
Step 3: In the Pause updates section, select a date until which you would like to pause updates.
Method 2 of 7
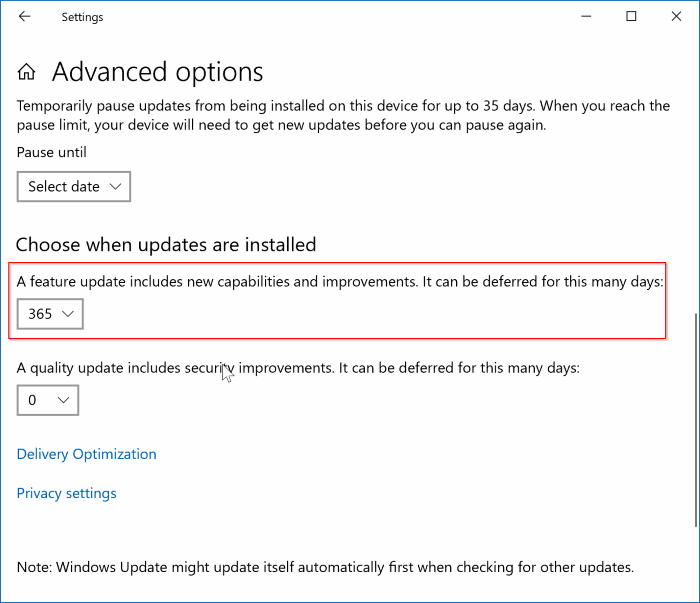
Pause feature updates for up to 365 days
Features updates are the major updates Windows 10 receives twice a year. Around April and October, Microsoft releases major updates (feature updates) to Windows 10. Here is how to stop them for a year:
Step 1: Open the Settings app. Go to Updates & Security > Windows Update.
Step 2: On the right side, click on Advanced options.
Step 3: In the Choose when updates are installed section, you will see “A feature update includes new capabilities and improvements. It can be deferred for these many days” option. Select a number from the drop-down box. The maximum supported is 365 days.
Method 3 of 7
Use Group Policy to disable Windows Update
In this method, we are going to use the Local Group Policy Editor. Since Group Policy Editor is not present in Windows 10 Home edition, this method is not applicable to Windows 10 Home.
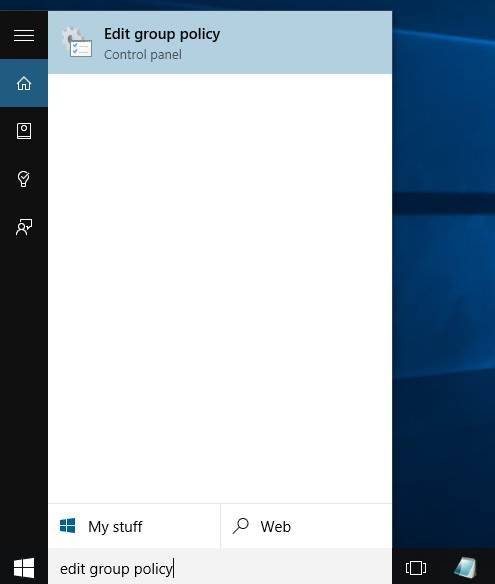
Step 1: Open Local Group Policy Editor. To do so, type Edit Group Policy in Start or taskbar search box and then press Enter key. Alternatively, open Run command box, type Gpedit.msc, and then press Enter key to open the same.
Step 2: Navigate to the following policy:
Computer Configuration > Administrative Templates > Windows Components > Windows Update.
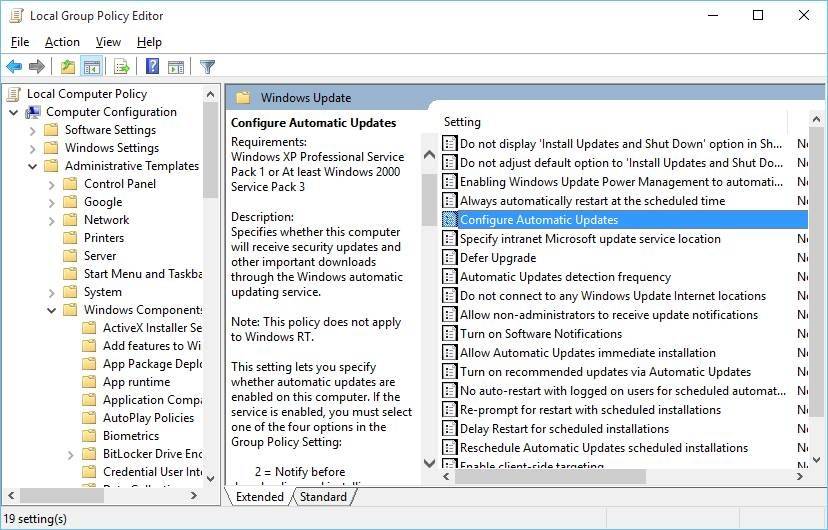
Step 3: On the right-side, double-click on the policy labeled Configure Automatic Updates to open its properties.
Step 4: Select the Enabled option. Under Configure automatic updating, select the second option labeled Notify for download and notify for install. Don’t touch the rest of the settings.
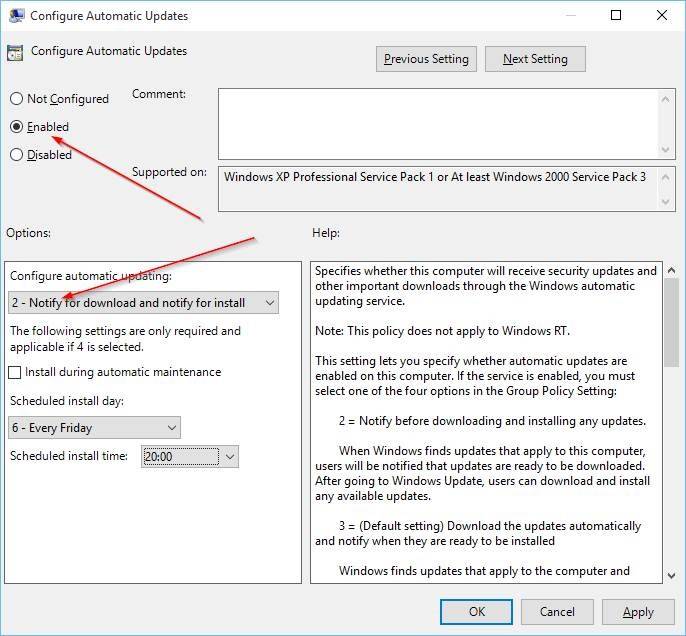
Click the Apply button. As mentioned before, this method will not turn off Windows Update, but you will be notified when updates are available to download. You can ignore the alert to avoid downloading and installing updates.
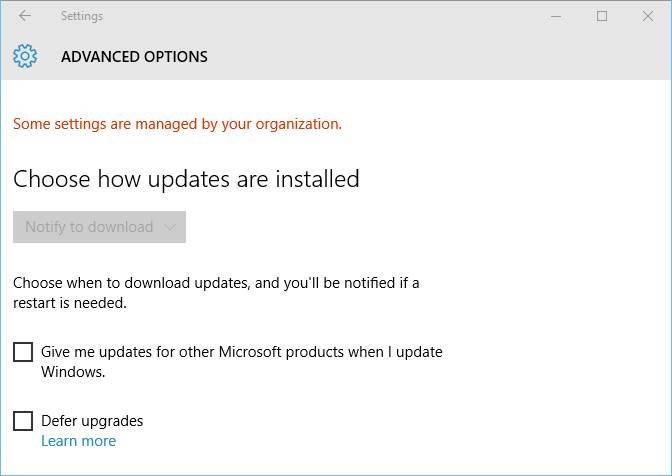
When this policy is enabled, you’ll see Some settings are managed by your organization message under Advanced options of Windows Update.
Method 4 of 7
Disable updates via Registry
If you are on Windows 10 Home, you can disable the automatic update by making modifications to the Registry. Here is how to do that.
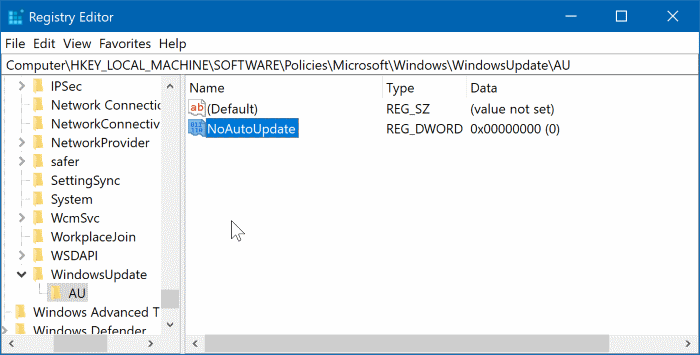
Step 1: Open the Registry Editor by typing Regedit.exe in the Start/taskbar search field and then hitting the Enter key.
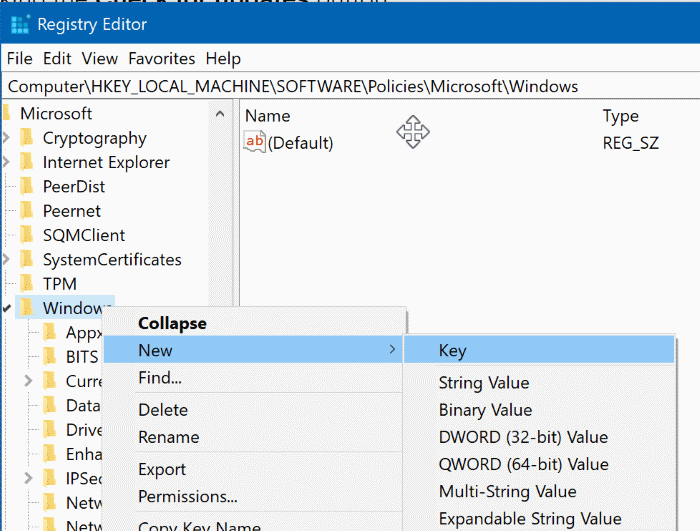
Step 2: Navigate to the following key:
ComputerHKEY_LOCAL_MACHINESOFTWAREPoliciesMicrosoftWindows
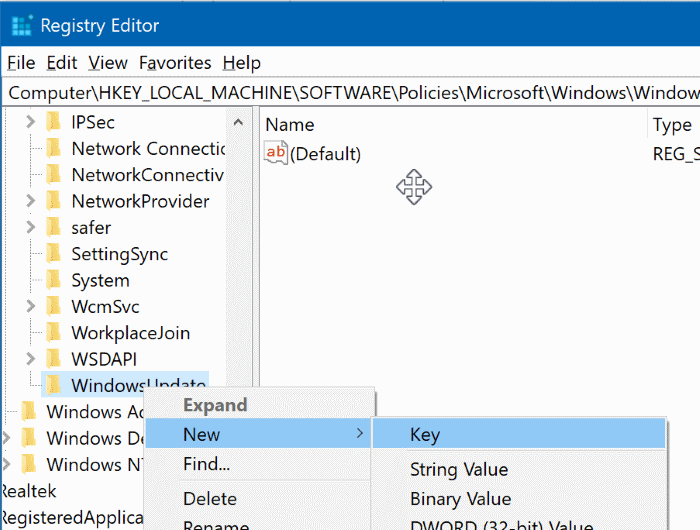
Step 3:Right-click on the Windows key, click New and then click Key. Name it as WindowsUpdate.
Step 4: Now that you have created WindowsUpdate key, right-click on it, click New, and then name it as AU.
Step 5: Now, right-click on the AU key, click New and then click DWORD (32-bit) Value. Name it as NoAutoUpdate.
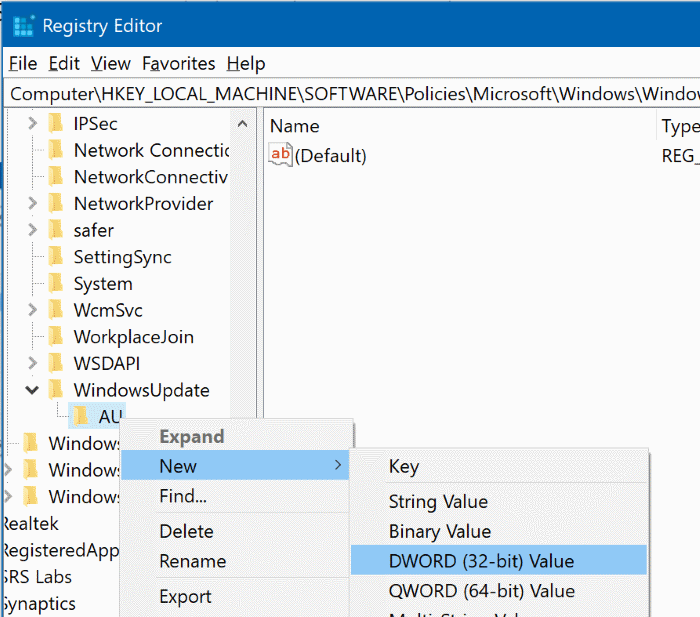
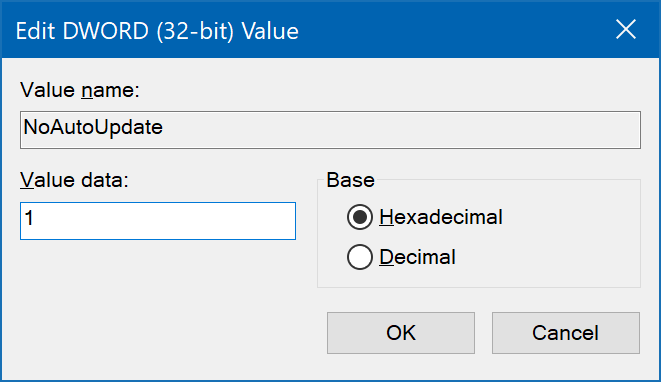
Step 6:Double-click on NoAutoUpdate and then change its value data from 0 to 1 to disable automatic updates.
Note that this disables automatic updates only. You can manually check for updates by clicking the Check for updates button in Settings > Update & Security > Windows Update page.
Method 5 of 7
Disable Windows Update service permanently
This is the best method to completely disable Windows Update in Windows 10. In this method, we will disable the service responsible for checking, downloading, and installing updates for Windows and other programs including Windows Defender.
Step 1: Type Services in Start menu or taskbar search box and then press Enter key. Alternatively, you can type Services.msc in Run command box and then press Enter key to open Services.

Step 2: Here, look for the service named Windows Updates. Right-click on it and click Properties to open Windows Update Properties dialog.

Step 3: Here, change the Startup type to Disabled. Click the Apply button and then reboot your computer. That’s it!
From here on, Windows 10 will not be able to check for updates. Good luck!
Method 6 of 7
Use Windows Update Disabler
Over the past few years, a bunch of applications has been released to help Windows 10 users block updates. One of them and probably the best of the lot is Windows Update Disabler. With Windows Update Disabler, you can disable the updates in Windows 10 with a click.
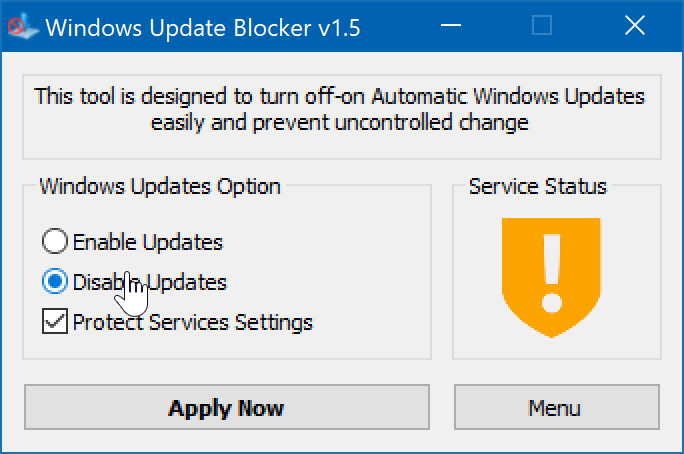
Download Windows Update Blocker
Method 7 of 7
Change your network type to Metered
This solution is no longer effective as Windows 10 now download priority or critical updates when on a metered connection.
By default, Windows 10 doesn’t download all updates when you’re on a metered connection. It downloads only priority updates when on a metered connection. You can make use of this by setting Metered connection property to your network connection.
To set a network as metered, do this:
Step 1: Navigate to Settings app > Network & Internet > Wi-Fi.
Step 2: On the right side, you can see the Wi-Fi network name (SSID) that your PC is connected to. Click on it.
Step 3: In the Metered connection section, turn on the Set as the metered connection option.
For ethernet connection, refer to our how to set an Ethernet connection as a metered network in Windows 10 guide for step-by-step instructions.
Используемые источники:
- https://www.cleverfiles.com/howto/disable-update-windows-10.html
- https://www.techmesto.com/disable-automatic-updates-windows-10/
- https://www.intowindows.com/how-to-disable-windows-update-in-windows-10/
 Драйверы для ноутбука HP G62-a16ER / G62-b26ER (Windows 7)
 15 советов по работе с браузером Microsoft Edge
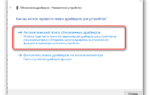 Драйверы для ноутбука ASUS K52J (K52JB / K52JC / K52JE / K52JK / K52JT / K52Jr)
 RDCMan (Remote Desktop Connection Manager) – RDP консоль для администратора