Содержание
- 1 Create Bootable USB disk Manually using command prompt
- 2 Why we need to create a bootable Windows 10 USB drive?
- 3 How to download windows 10 bootable USB or ISO image for clean windows installation.
- 4 Method #1 — Create UEFI Bootable USB Drive in Windows 10 Using Windows USB Tool
- 5 Method #2 — Use Rufus to Create UEFI Bootable Windows 10 USB Drive
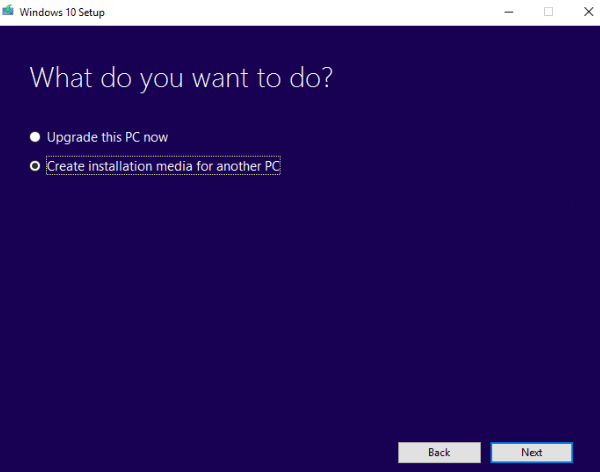
Windows 10 is set to be released later this month. The OS will be available on flash drives, however, if you want to create your own bootable USB drive for Windows 10, you can do that pretty easily. Here’s how to:
The easy way to create a bootable USB drive for Windows 10
There’s always an “easy way” to do things on Windows using some kind of software. Creating a bootable USB drive is also pretty easy – here’s how to do it:
- Download Rufus from here
- Click and Open rufus.exe
- Once the user interface of the software opens up, plug-in your USB
- After that, look for the “Create a bootable USB drive option” and from the drop-down, select an ISO Image
- Then, click on the button next to the dropdown and select the Windows 10 ISO that you want to install
- Lastly, click on “Start” and wait for the software to create the bootable USB drive.
That’s pretty much it. You now have a bootable USB drive, just plug it in your device and make sure your BIOS is all setup and you should now be able to easily install Windows 10 using the bootable USB drive that you just created.
The hard way
If you don’t want to use any software, there’s another way of creating a bootable USB drive, but that’s a bit trickier. Here’s how to do it:
- First, make sure your USB drive is plugged in
- Search and open Command Prompt as an administrator
- Next, you’ll have to open the disk management utility using CMD (Command Prompt) – to do that, type in diskpart and hit enter
- After that, you will have to display the connected disks that are available – to do that, type in list disk and hit enter
- Then, you’ll need to select your USB drive – to do that, type select disk # and hit enter – you’ll have to replace the # with your disk number
- Next, you’ll have to clean the USB drive – to do that, type clean and hit enter
- Then you’ll need to create a bootable partition – type in create partition primary and hit enter
- You will now need to select the partition that you just created. To do that, type in select partition 1.
- After that, type active and hit enter
- Next, you’ll need to format the USB drive – just type in format fs=fat32 and hit enter
- You’ll now need to assign your USB drive a letter, to do that, just type in assign
- Lastly, copy all the Windows 10 files and paste it inside the USB drive. (You can copy the files by extracting an ISO or copy it from a Windows 10 disk).
That’s it! You have just manually created a Windows 10 bootable USB drive and it’s ready to install Windows 10 on your device.
Creating a bootable USB drive is pretty easy, to be honest. I’d recommend following the easy way of creating the bootable USB drive if you’re not an expert – however, if you’re an expert, just follow the hard way of creating the bootable USB drive and avoid using any type of software.
 Драйверы для ноутбука HP G62-a16ER / G62-b26ER (Windows 7)
You can download windows 10 iso file for free directly from Microsoft using this media creation tool. An activation key will be required during the installation process.
2. Using Windows USB / DVD Download Tool
This is the old and still reliable method to create a bootable media for Windows Installation. Its name can confuse you but It is also working perfectly for Windows 10 as well. But this method require ISO image of the Windows 10. So first you have to download the Windows 10 iso file.
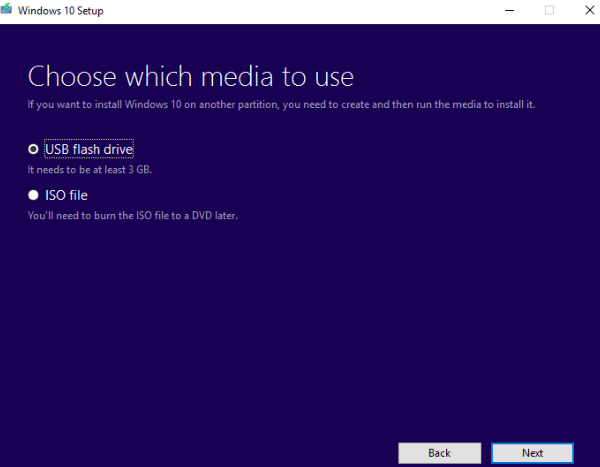
- This process needs an empty USB stick (Min: 8GB). Quick format the USB drive first.
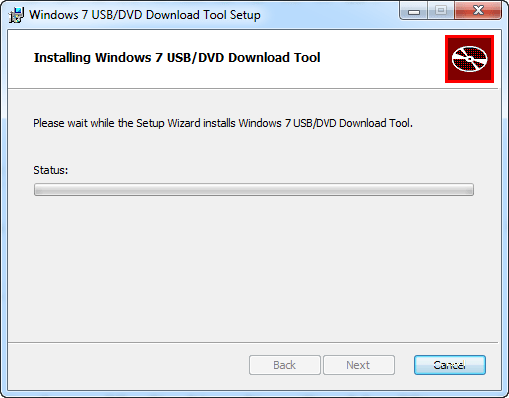
- Download Windows USB / DVD Download Tool & Install it on your computer.
- After finishing of its installation, Run it.
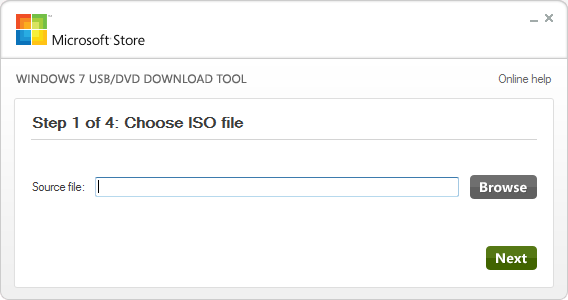
- It requires ISO image file of the windows. Select the ISO image and start the process. you can download the iso file of windows 10 using media creation tool as mentioned in method 1.
- After completion of the process your bootable USB / DVD installer disk will be ready to use.
3. Create Bootable Windows 10 disk With the help of third party software
Though you will not be require to come to this method, but we are mentioning here if there is any issue in running Microsoft tools. Building a boot-able flash drive becomes pretty easy with the use of external software, named Rufus. Here are the essential guidelines when using Rufus for making a bootable Windows 10 flash drive.
- Download Rufus.
- Open Rufus.exe
- When the software launches on the screen, plug in your USB flash drive.
- Find the option Create a bootable USB drive.
- From the menu that follows, select an ISO image.
- Now click on the button next to this menu and click the Windows 10 ISO which you want to install on your computer.
- Now hit Start and the software will begin to create the bootable USB flash drive.
- Once you have developed the USB flash drive, just plug it in and you are ready to install / reinstall Windows 10.
Create Bootable USB disk Manually using command prompt
This method is useful for advanced users. Sometimes users only have access to command prompt . They are unable to start the Windows. In this case if you have an ISO file you can create a bootable pen drive using this method. Follow the given guidelines carefully as this method is a little complicated:
- Plug in your USB drive.
- Search Command Prompt.
- Run it as an administrator.
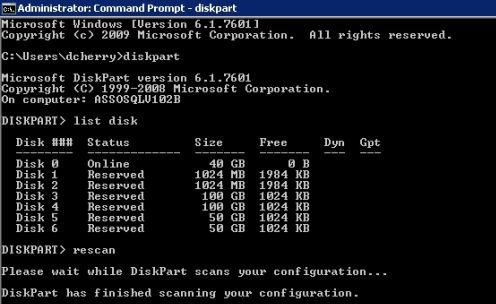
- Open the disk management utility using Command prompt.
- For this purpose, type diskpart in the CMD and hit Enter.
- Now type list disk and hit Enter. This will display the list of available connected disks.
- From this list you need to select your USB drive. For this, type select disc # and press Enter (Replace # with your disk number from the list)
- The next step is to clean the USB drive. For this purpose, type clean and hit Enter.
- Now create a bootable partition, simply type Create partition primary and press Enter.
- You need to select the partition you just created. Type select partition 1 and then type active and hit Enter.
- Now format the USB drive by typing format fs=fat32. After this press Enter.
- Assign a letter to your USB drive, just type assign.
- Finally, copy all the files of Windows 10 and paste them in the USB drive. Files can be copied from a Windows 10 disk or by extraction from an ISO file.
And that is all there is to know about the manual creation of a bootable Windows 10 USB flash drive. all the methods are equally useful. If you’re an expert you can use the manual method without taking help of software, but beginners are advised to seek software help to avoid any complications. The best and easy method is using the Windows Media Creation Tool .
Are you still using the Windows 7? Microsoft has ended the windows 7 support. Upgrade to Windows 10 as early as possible.
Why we need to create a bootable Windows 10 USB drive?
Since the availability of USB drives, the use of CD and DVD has prominently declined. The major reasons behind this are the ease of use, portability, larger capacity and faster copying of data files by the USB drives in comparison to the older methods. All you need is a flash drive with a capacity of more than 4GB, although 6 to 12 GB available space is ideal for storing additional files as well. Create a bootable USB drive and keep it in a safe place that you can use this disk to easily fix the installation issues.
How to download windows 10 bootable USB or ISO image for clean windows installation.
Given above method 1 can be used to easily download the ISO image file. We didn’t found any other direct link to download iso image for offline purpose. So downloading it using the media creation tool is the only method to get it directly from the Microsoft.
You can also upgrade to Windows 10 for Free using windows 7 license key.
 FIX: Lenovo B590 sound not working on Windows 10, 8.1
Please share your experience with the creation of bootable windows 10 disk using the below comment box.
Was this article helpful?
Let us know if you liked the post. That’s the only way we can improve.
If you’ve bought a system in recent years, it is most probably a UEFI (Unified Extensible Firmware Interface) supported system. When using a UEFI enabled system, it is better to use a UEFI bootable USB drive to install Windows 10. Generally, most bootable USB creation software available on the internet only creates bootable USB drives that support Legacy BIOS. Those Legacy BIOS bootable drives might not work with the new UEFI system. Here are a few methods you can use to create a UEFI bootable Windows 10 USB installer device.
Jump to:
Note: For this quick guide, I assume you’ve already have the Windows 10 ISO. If not, download Windows 10 ISO from Microsoft download page.
Warning: While creating a UEFI bootable USB drive, any data in the USB drive will be lost due to formatting. So, backup all the data in the USB drive before proceeding any further.
Method #1 — Create UEFI Bootable USB Drive in Windows 10 Using Windows USB Tool
Microsoft supplies its own official tool to create bootable Windows 10 USB drive. Though you will not see any UEFI options, if you are on a UEFI supported system the tool will create UEFI bootable USB drive. If you are on a Legacy BIOS system, the tool will create regular BIOS supported bootable USB drive.
So, before creating the bootable drive, check if you are on a UEFI or BIOS system. If you are on a legacy BIOS system, follow the second method.
1. First, download the Windows USB Download Tool from the official Microsoft website. After downloading, install it like any other Windows software.
 Lenovo B Series B590 All Drivers for Windows XP/7/8/10 (32-bit,64-bit) Download
2. Plug the USB drive into an empty USB port on your computer. Make sure that the USB drive you are using is at least 8GB.
3. After installing the tool, find it or search for it in the start menu and open it.
4. In the main screen, you need to add ISO file. So, click on the «Browse» button.
5. A browse window will open. Go to where you’ve stored the Windows 10 ISO file, select it and click on the «Open» button.
6. The above action will add the file path to the tool. Click on the «Next» button.
8. If you’ve already plugged in the USB drive, it will show up in the drop-down menu. If not, plug in the USB drive, click on the «refresh» button, select the USB drive from the drop-down menu and click on the «Begin copying» button.
9. As soon as you click on the Begin Copying button, the tool will warn that the USB drive will be formatted. Click on the «Erase USB Device» button to continue.
10. The tool starts to create the bootable Windows 10 USB drive. It can take some time to complete. So, sit back and wait.
11. After completing the creation process, you will see «Status: Backup completed» message under the progress bar. Close the tool by clicking on the «X» icon appearing at the top right corner.
That is all. You are done creating the UEFI bootable USB drive in Windows 10.
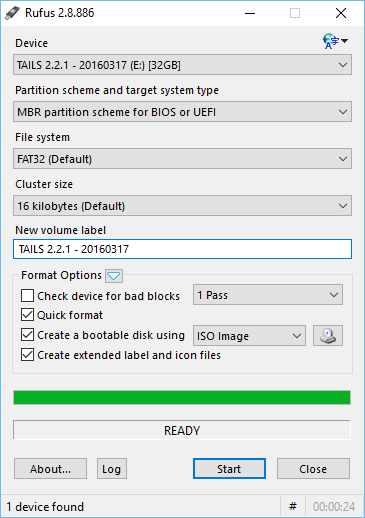
Method #2 — Use Rufus to Create UEFI Bootable Windows 10 USB Drive
You can also use a free third-party tool called Rufus to create the UEFI bootable drive. The best thing about Rufus is that it is filled with features and you can select whether you want to create a UEFI drive or Legacy BIOS drive. Additionally, Rufus supports creating bootable drives for both Windows and Linux.
1. To start off, download Rufus from its official website. Apart from the regular installer, there is also a portable version if you don’t want to install it on your Windows machine.
2. Once download, execute the downloaded file. On the main screen, select your USB device from the first «Device» drop-down menu.
3. Next, select the «GPT partition scheme for UEFI» option from the drop-down menu under «Partition scheme and target system type».
4. Select the checkbox «Create a bootable disk using» and then select «ISO Image» option from the drop-down menu. Click on the disk icon appearing next to the drop-down menu.
5. In the browse window, go to where you’ve stored the Windows 10 ISO image, select it and click on the «Open» button.
6. As soon as you add the ISO image, you will see additional options appear under the «Create a bootable disk using» option. Make sure that the radio option «Standard Windows Installation» is selected.
7. Click on the «Start» button.
8. You will see a warning message saying that the USB drive will be formatted. Click on the «Ok» button to continue.
9. Rufus now starts to create the UEFI bootable USB drive. This can take some time to complete.
11. When the UEFI USB creation process is complete, you will hear the completion sound and see that the progress bar is at a hundred percent. You can now close the Rufus tool and unplug the USB drive.
That is all. You are done creating bootable UEFI USB drive in Windows 10.
If you like this article, do check out how to change OEM information in Windows 10 and how enable Windows 10 sandbox feature.
Используемые источники:
- https://mspoweruser.com/how-to-create-a-bootable-usb-drive-for-windows-10/
- https://www.techsupportall.com/how-to-create-a-bootable-windows-10-usb-disk-dvd-installer/
- https://windowsloop.com/create-uefi-bootable-usb-windows-10/

 Драйверы для ноутбука ASUS K52J (K52JB / K52JC / K52JE / K52JK / K52JT / K52Jr)
 Драйверы для ноутбука ASUS A52JB / A52JC / A52JK / A52Jr / A52JU (Windows 7)
 Драйверы для ноутбука HP Pavilion dv6-6101er (Windows 7 x64)