Содержание
Update errors aren’t a novelty in the Windows OS history. Some of them are easy to resolve, while some of them are quite a challenge.
Today we’ll try to address an error that goes by the code 0x8007001F. This error is closely related to audio drivers and it prevents users from updating in Windows 10.
There are a few possible workarounds applicable to this problem, so follow these steps and, hopefully, we can work it out.
How can I fix update error 0x8007001F on Windows 10?
Update error 0x8007001F can prevent you from installing the latest updates, which can be a big problem. Speaking of update issues, here are some problems that users reported:
- Windows failed to install the following update with error 0x8007001f – This error is usually caused by third-party applications, and if you encounter it, try disabling your antivirus or perform a clean boot.
- Windows 10 update assistant error 0x8007001f – Sometimes your drivers can cause this problem to appear, therefore it’s a good idea to update crucial drivers before trying to update Windows.
- Update error Windows 7, 8.1 – Update errors can appear on older versions of Windows as well. Even if you’re not using Windows 10, you should be able to apply most of our solutions to the older versions of Windows without any problems.
Solution 1 – Disable Antivirus
Although your antivirus will offer protection from malware, sometimes it can interfere with your system and cause 0x8007001F error to appear.
To fix the problem, it’s advised to change your antivirus settings and disable certain features. If that doesn’t help, you might have to temporarily disable your antivirus.
In worst case scenario, you might even have to remove your antivirus from your PC. Many users reported that both Norton and McAfee can cause this error to appear, so if you’re using one of these tools, be sure to remove them.
For the Norton users, we’ve got a dedicated guide on how to completely remove it from your PC. There’s a similar guide for McAffe users, as well.
If you’re using any antivirus solution and you want to completely remove it from your PC, be sure to check out this amazing list with the best uninstaller software you can use right now.
Although these two applications are the most common cause of this error, other antivirus tools can cause this issue as well, so be sure to remove them.
 Использование новых NVMe SSD в качестве загрузочного диска на старых системах с Legacy BIOS (для любой ОС)
If removing your antivirus solves the problem, it might be a good time to consider switching to a different antivirus solution. If you’re looking for a new antivirus, you might want to consider BullGuard.
This application offers great protection, and it won’t interfere with your system, so feel free to try it out.
Looking to change your antivirus with a better one? Here’s a list with our top picks.
Solution 2 – Uninstall audio drivers
According to users, sometimes error 0x8007001F can appear on your PC due to your audio drivers. If your audio drivers are outdated or corrupted, you might encounter this issue.
To fix the problem, you need to reinstall your audio drivers. To do that, just follow these steps:
- Press Windows Key + X and choose Device Manager from the list.
- Now navigate to Sound, video, and game controllers section and right-click your audio device. Choose Uninstall device from the menu.
- A confirmation dialog will now appear. If available, check Remove driver software for this device. Now click Uninstall button to remove the driver.
After doing that, you should try to download the latest drivers for your audio device. Simply visit your motherboard or sound card manufacturer’s website and download the latest drivers.
Did you know that the majority of Windows 10 users have outdated drivers? Be a step ahead using this guide.
After updating your audio driver, check if the problem is resolved.
In order to avoid permanent damage to your PC by downloading and installing the wrong driver versions, we strongly recommend TweakBit’s Driver Updater (approved by Microsoft and Norton).
 Lenovo B Series B590 All Drivers for Windows XP/7/8/10 (32-bit,64-bit) Download
This tool will automatically download all the outdated drivers on your PC.
Disclaimer: some features of this tool are not free.
Solution 3 – Restart the Windows Update Service
Update service can be a culprit for various update issues. Additionally, it’s known for inflicting heavy CPU usage on some occasions for no apparent reason.
Nevertheless, we will show you a possible workaround that can be used with most of the update errors. And the one we are currently addressing is not an exception. Here’s what you need to do:
- Press Windows Key + R and enter services.msc. Now press Enter or click OK.
- In Services list, search for Windows Update. Right-click and open Properties.
- Now choose Disabled as Startup Type.
- Save changes and restart your PC.
- Check out Services again and make sure that Windows Update is Disabled.
- Navigate to C:Windows and find SoftwareDistribution folder.
- Rename folder to SoftwareDistribution.OLD (you can delete it, as well but why to take unnecessary risks).
- Once again navigate to Services and find Windows Update and, in Properties, change Startup Type from Disabled to Manual.
- Go to Start and open Settings on the left side.
- Open Update & Security and check for updates.
Have in mind that you’ll need administrative access in order to change/delete system folders. This procedure proved as a valid solution for multiple update errors. However, if the problem is persistent, move on to the next solution.
For more info on how to delete the Software Distribution folder, check out this dedicated guide. There’s a similar article about renaming the Software Distribution folder.
Having trouble updating your Windows? Check out this guide that will help you solve them in no time.
Solution 4 – Perform SFC and DISM check
Sometimes error 0x8007001F can appear due to corrupted system files. If that’s the case, we recommend to perform SFC scan and repair your files. To do that, you need to follow these steps:
- Press Windows Key + X to open Win + X menu. Now select Command Prompt (Admin) from the list. You can also use PowerShell (Admin) if Command Prompt isn’t available.
- When Command Prompt opens, run sfc /scannow command.
- SFC scan will now start. This scan can take up to 15 minutes, so don’t interfere with it.
Once the SFC scan is finished, check if the problem is resolved.
 FIX: Lenovo B590 sound not working on Windows 10, 8.1
If you’re having trouble accessing Command Prompt as an admin, then you better take a closer look at this guide.
scannow command has stopped before the process finished? Don’t worry, we’ve got an easy fix for you.
The system update malfunctions are closely related to file corruption. Namely, due to malware infections, some of the system files can get corrupted or quarantined.
For that reason, DISM (Deployment Image Servicing and Management) can be used to scan and resolve this issue by repairing broken files.
- Right-click on Start and run Command Prompt (Admin).
- Type the following command:
- DISM.exe /Online /Cleanup-image /Restorehealth
- If the service has some problems connecting with Update, you can use USB/DVD system drive. Just insert media and type the following command:
- DISM.exe /Online /Cleanup-Image /RestoreHealth /Source:C:Your Repair SourceWindows /LimitAccess
- Make sure that you replaced repair source path with your own.
It seems that everything is lost when DISM fails on Windows? Check out this quick guide and get rid of the worries.
Solution 5 – Perform a clean boot
According to users, third-party applications can sometimes interfere with your system, and that can lead to this error. However, you might be able to fix the problem simply by performing a clean boot. To do that, follow these simple steps:
- Press Windows Key + R and enter msconfig. Press Enter or click OK.
- System Configuration window will now appear. Go to Services tab and then check Hide all Microsoft services. Now click Disable all button.
- Go to Startup tab and click Open Task Manager.
- List of startup applications will now appear in Task Manager. Right-click the first item on the list and choose Disable from the menu. Now repeat these steps for all startup items on the list.
- Go back to System Configuration window and click Apply and OK to save changes.
- Restart your PC.
Once your PC restarts, all startup applications and services will be disabled ensuring that third-party applications don’t interfere with the upgrade process. After disabling all these services, you should be able to upgrade without any issues.
If you want to know how to add or remove startup apps on Windows 10, check out thissimple guide.
Can’t open Task Manager? Don’t worry, we’ve got the right solution for you.
Solution 6 – Create a new user account
If you have problems updating due to error 0x8007001F, the issue might be a corrupted user account. However, you might be able to circumvent this issue simply by creating a new user account. To do that, follow these simple steps:
- Press Windows Key + I to open the Settings app.
- When Settings app opens, navigate to the Accounts section.
- In the left pane, select Family & other people. In the right pane select Add someone else to this PC.
- Now select I don’t have this person’s sign-in information.
- You’ll be asked to create a Microsoft account. Select Add a user without a Microsoft account.
- Now enter the desired user name and click Next.
After creating a new account, switch to it and check if the problem is resolved.
If you’re having trouble opening the Setting app, take a look at this article to solve the issue.
Windows won’t let you add a new user account? Follow some easy steps and create or add how many accounts you want!
Solution 7 – Perform an in-place upgrade
If you can’t install Windows Updates due to error 0x8007001F, you might want to try performing an in-place upgrade. By doing that, you’ll force Windows 10 to update to the latest version. To do that, you need to do the following:
- Download Media Creation Tool and run it on your PC.
- Select Upgrade this PC now.
- Wait while the application prepares your system.
- Now select Download and install updates (recommended) and click Next.
- Follow the instructions on the screen until you get to Ready to install screen. Now select Change what to keep.
- Select Keep personal files and apps and click Next.
- Follow the instructions on the screen to complete the setup.
Once the process is finished, you’ll have the latest version of Windows installed, and all your files and apps will be preserved.
Can’t run the Windows Media Creation tool? Don’t worry, we’ve got the right solution for you.
That should wrap it up. Your error should be resolved if you followed these instructions closely. In case you have some questions or additional workarounds, please be sure to inform us in the comments section.
For more Windows Update workarounds, and additional info, make sure to check our Windows Update hub.
RELATED STORIES YOU NEED TO CHECK OUT:
Editor’s Note: This post was originally published in March 2017 and has been since completely revamped and updated for freshness, accuracy, and comprehensiveness.
Если при обновлении до Windows 10 вы видите код ошибки 0х80070001, это может быть вызвано несколькими факторами, об устранении которых мы расскажем в этом материале.
Подробности об ошибке 0х80070001
Все больше пользователей задумываются об обновлении до Windows 10, так как она является не только наиболее современной, но и наиболее совершенной ОС от компании Microsoft. К сожалению, при установке Windows 10 можно увидеть код ошибки 0х80070001, который при обновлении становится причиной прерывания процесса и возврата к предыдущей версии операционной системы. После появления подобной проблемы многие пользователи решают забыть об обновлении до Windows 10, но эта статья расскажет о том, как без особых проблем избавиться от ошибки 0х80070001 и продолжить процесс установки.
![]()
Причины появления ошибки 0x8007000 и процесс их устранения
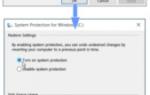
Антивирус блокирует изменения и перезапись файлов при обновлении до Windows 10. Для того чтобы установить новую версию операционной системы, программа обновления перезаписывает, удаляет или записывает на системный раздел жесткого диска огромное количество файлов. Антивирусное ПО, установленное в вашей системе может распознать это действие, как угрозу безопасности и заблокировать его. Вследствие этого на дисплее отобразится ошибка 0х80070001.
Чтобы избавиться от подобной проблемы, отключите антивирус или даже удалите его из системы на время установки обновления. После первого запуска Windows 10 вы сможете установить или запустить антивирус повторно.
Кэшированные данные и файлы магазина Windows блокируют доступ на сервер Microsoft при обновлении системы. Если на вашем ПК до запуска обновления была установлена Windows 8, вероятно, в системе скопилось некоторое количество временных файлов и кэша, которые при обращении к серверу обновления становятся причиной ошибки.
- Отмените процесс установки обновления.
- Нажмите сочетание клавиш Win+R, чтобы открыть окно «Выполнить».
- Введите команду wsreset.
- Нажмите Enter.
Эта процедура сбросит настройки магазина и очистит лишние системные файлы, которые блокируют доступ к сетевым ресурсам Microsoft при обновлении до Windows 10.
Сторонние или периферийные устройства конфликтуют с новыми системными файлами при установке обновления. Еще до начала процедуры установки проверьте системный блок и отключите все устройства, которые не понадобятся в ближайшие пару часов — флешки, внешние жесткие диски, принтеры, джойстики и прочее. Это поможет произвести чистую установку обновления. Драйверы и настройки всех подобных периферийных устройств будут произведены после повторного их подключения.
Объем системного раздела, на который производится установка обновления не имеет достаточного пространства. Перед началом обновления запустите установщик и ознакомьтесь с его требованиями. На одном из этапов запуска установщик укажет какой объем свободного пространства необходим для успешной установки. Освободите необходимое место и повторите процедуру обновления.
Обратите внимание на то, что в некоторых случаях может потребоваться применение не одной, а сразу нескольких инструкций из этой статьи.
Нашли опечатку? Выделите текст и нажмите Ctrl + Enter
0x8007001F-0x20006, Сбой установки на этапе SAFE_OS с ошибкой во время операции REPLICATE_OC.
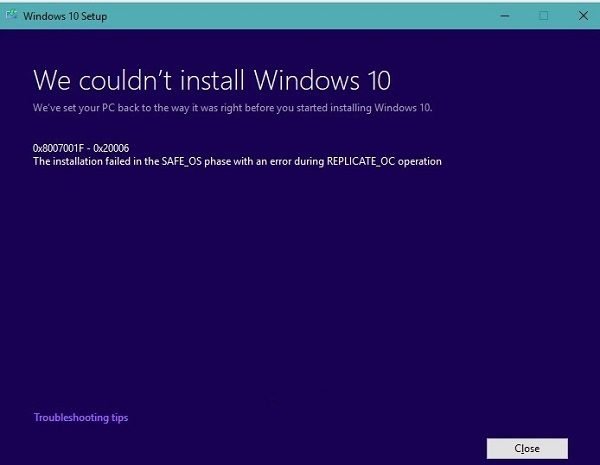
Фаза безопасной ОС: эта фаза запускается для установки всех необходимых обновлений. Возможными причинами этого могут быть прерванная загрузка, подключение к Интернету и т. Д.
Мы рассмотрим следующие предложения, чтобы устранить код ошибки 0x8007001f — 0x20006 для обновления до Windows 10:
- Используйте средство устранения неполадок Центра обновления Windows.
- Сброс компонентов Центра обновления Windows.
- Удалите кэш Центра обновления Windows.
- Настройте брандмауэр или антивирус.
- Запустите обновления Windows в чистом состоянии загрузки.
1] Использование средства устранения неполадок Центра обновления Windows
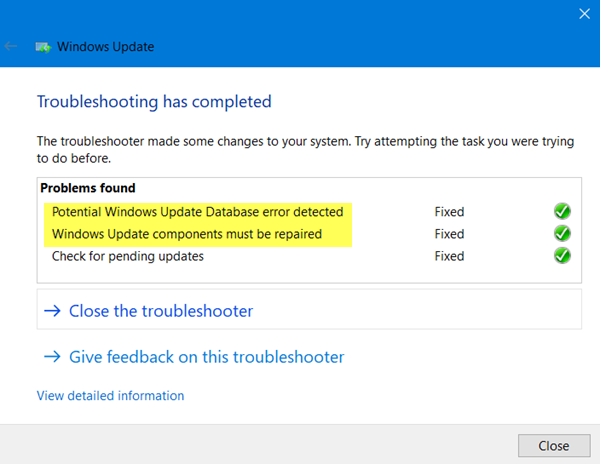
Вы можете запустить средство устранения неполадок Центра обновления Windows, а также средство устранения неполадок Центра обновления Windows от Microsoft и проверить, поможет ли это в решении любой из ваших проблем.
2] Сброс компонентов Центра обновления Windows
Вам необходимо удалить содержимое папки SoftwareDistribution и сбросить папку Catroot2.
3] Удалите кэш Центра обновления Windows
Иногда существующие поврежденные или неполные файлы Центра обновления Windows также могут вызывать проблемы и конфликты при загрузке и установке Центра обновления Windows.
Удалите папки $ Windows. ~ BT & $ Windows. ~ WS, если они присутствуют на вашем компьютере.
Проверьте, исправили ли это ваши проблемы.
4] Настройте брандмауэр или антивирус .
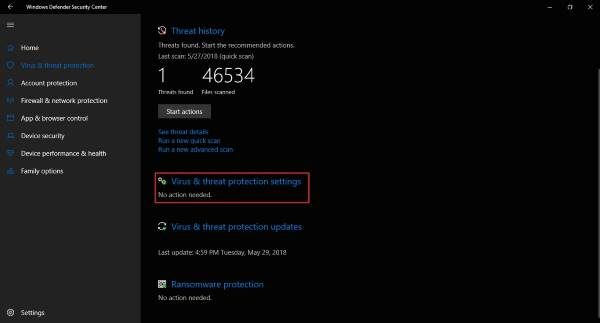
Вы можете попытаться временно отключить Защитника Windows, который установлен из коробки на вашем компьютере с Windows 10. Вы также можете отключить брандмауэр Windows на своем компьютере и проверить, исправляет ли это ошибки, с которыми вы сталкиваетесь. Если вы используете стороннее программное обеспечение безопасности, отключите их и посмотрите.
5] Запускайте обновления Windows в чистом состоянии загрузки
Чистая загрузка запускает систему с минимальными драйверами и программами запуска. При запуске компьютера в режиме чистой загрузки компьютер запускается с использованием предварительно выбранного минимального набора драйверов и программ запуска, а поскольку компьютер запускается с минимальным набором драйверов, некоторые программы могут работать не так, как ожидалось.
Вы можете запустить Центр обновления Windows после загрузки в состояние чистой загрузки и проверить, устраняет ли это ошибку.
Помогли ли вам эти исправления?
Используемые источники:
- https://windowsreport.com/windows-10-update-error-0x8007001f/
- https://gamesqa.ru/kompyutery/kak-ustranit-oshibku-0x80070001-voznikayushhuyu-pri-obnovlenii-do-windows-10-2286/
- https://techarks.ru/windows/obnovleniya-windows/obnovlenie-windows-10-prodolzhaet-sboj-s-oshibkoj-0x8007001f-0x20006/
 Download Windows 10 Acer Drivers
 Драйверы для ноутбука HP G62-a16ER / G62-b26ER (Windows 7)
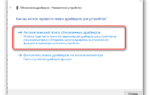 Драйверы для ноутбука ASUS K52J (K52JB / K52JC / K52JE / K52JK / K52JT / K52Jr)
 How To Turn Off Windows 10 Updates Permanently.