Содержание
Для чего может понадобится изменить User-Agent
- Разработчики и администраторы веб-сайтов могут оценить достаточно ли оптимизирован их ресурс для разных обозревателей и устройств;
- В случаях, когда необходимо «обмануть» тот или иной сайт, чтобы получить доступ к содержимому, предназначенному для другой платформы или устройства (так как в зависимости от «юзерагент» одна и та же интернет-страница может предлагать разный контент);
- Вообще, User-Agent позволяет определить довольно много различных параметров: название интернет-обозревателя и его версию, движок рендеринга, операционную систему и её разрядность, язык интерфейса, разрешение экрана, тип устройства, IP, и многое другое. Поэтому подмену User Agent можно рассматривать и как одну из мер обеспечения конфиденциальности пользователя в Сети.
Как изменить User Agent в Google Chrome и Яндекс.Браузер
Подменить User-Agent в Google Chrome, Яндекс Браузер, Opera и других Chromium-обозревателях можно, как, используя непосредственно настройки самого веб-браузера, так и посредством расширений.
Далее рассмотрим, как это сделать на примере браузера от Яндекса.
Способ 1. Настройки
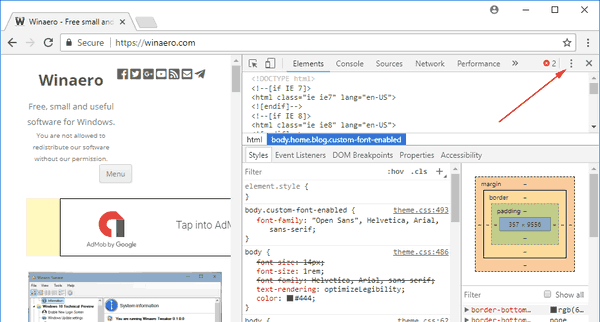
- Откройте «Инструменты разработчика» – сочетание клавиш CTRL + SHIFT + I (работает в Google Chrome, Яндекс Браузере, Opera) или просто нажмите F12;
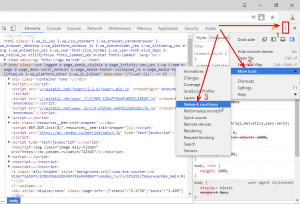
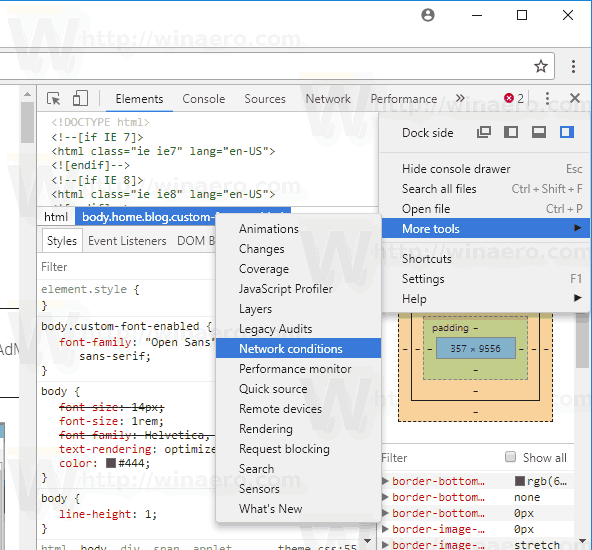
- В правом верхнем углу нажмите кнопку в виде трёх точек → More tools → Network conditions (см. скриншот);
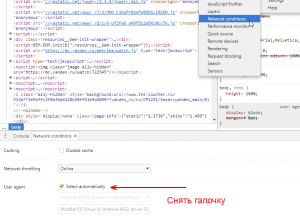
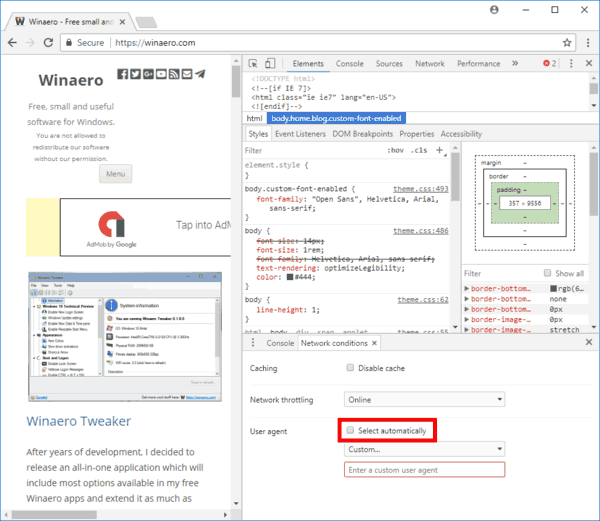
- Снимите галочку с «Select automatically»;
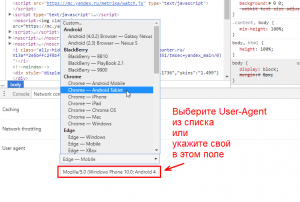
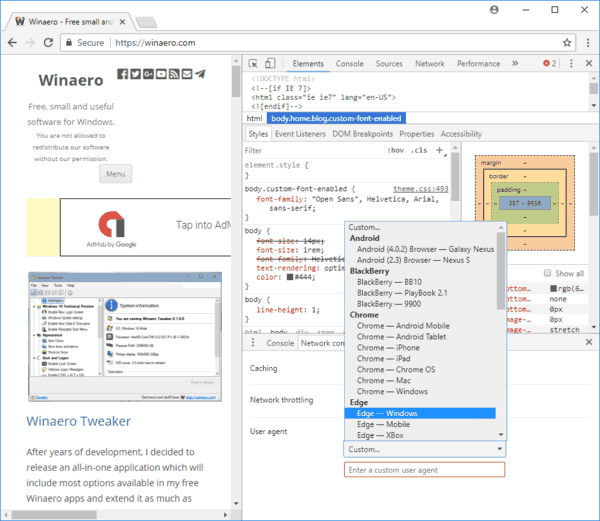
- Нажмите «Custom…» → выберите необходимый агент из списка, или укажите свой в соответствующем поле ниже.
Недостаток этого способа заключается в том, что User Agent будет меняться только для текущей страницы, т.е. для каждой новой вышеописанную процедуру надо будет повторять.
Способ 2. Специальные расширения
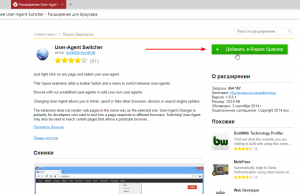
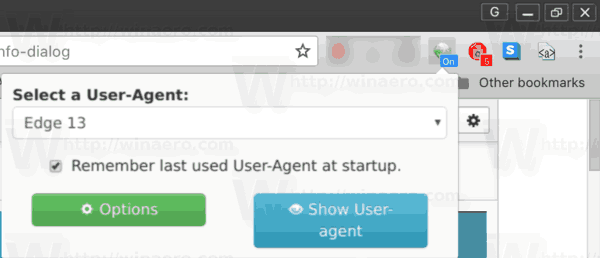
Поменять юзерагент можно и с помощью браузерных дополнений, например, такого, как User-Agent Switcher. Оно максимально упрощает этот процесс.
Всё что для этого понадобится:
- Перейти на официальную страницу дополнения (для Google Chrome или Яндекс.Браузер и Opera) → нажимаем «Установить» или «Добавить» (в зависимости от веб-обозревателя);
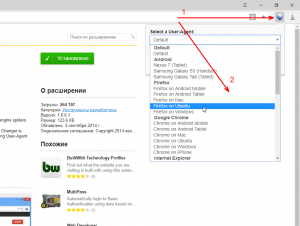
- После установки в правом верхнем углу обозревателя появится соответствующая иконка, кликнув по ней вы сможете легко поменять User-Agent по умолчанию (Default) на требуемый из списка.
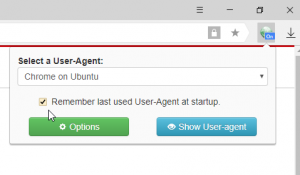
При этом, выбранный вами юзер агент будет задействован на всех сайтах, которые вы посетите (до завершения работы). Впрочем, можно поставить галочку напротив пункта «Remember last used User-Agent at startup»,
тогда работа будет возобновлена с тем же User-Agent, что вы задали во время предыдущей сессии.
В случае же, если вы хотите использовать подмену User Agent, как одно из средств защиты собственной конфиденциальности в Интернете, то обратите внимание наRandom User-Agent.
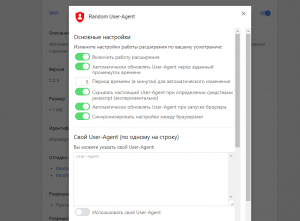
Random User-Agent способен не просто менять User Agent, а умеет это делать автоматически через заданный промежуток времени, скрывает настоящий User-Agent даже при определении средствами Javascript и обладает массой других полезных опций.
Читайте также:
-
Как скачать оригинальный ISO образ Windows 10 с сайта Microsoft
-
Воспроизведение звука при завершении работы в Windows 10
-
Как запустить командную строку от имени администратора в Windows 10
-
Как очистить кэш DNS в Windows
-
Windows: интересное (Spotlight) не работает – решение
-
Windows 10 Fall Creators Update: онлайн конвертер валют в калькуляторе
A browser’s user agent string (UA) helps identify which browser is being used, what version, and on which operating system. When feature detection APIs are not available, use the UA to customize behavior or content to specific browser versions.
Like all other browsers, Chrome for Android sends this information in the User-Agent HTTP header every time it makes a request to any site. It’s also available in the client through JavaScript using the navigator.userAgent call.
Chrome for Android
Chrome for Android reports its UA in the following formats, depending on whether the device is a phone or a tablet.
Phone UA:
Mozilla/5.0 (Linux; ; <build>) bKit/<webkit> (KHTML,cko) Chrome/<chrome>Mobile Sabkit></chrome></webkit></build>
Tablet UA:
Mozilla/5.0 (Linux; ; <build>) AppleWebKkit>(KHTML, like Gecko) Chrome> Safari/<webkit></build>
Here’s an exathe Chroagent string on a Galaxy Nexus:
Mozilla/5.0 (Linux; Android 4.0.4; Galaxy Nexus Build/IMM76B) AppleWebKit/535.19 (KHTML, like Gecko) Chrome/18.0.1025.133 Mobile Safari/535.19
If you are parsing user agent strings using regular expressions, the following can be used to check against Chrome on Android phones and tablets:
-
Phone pattern:
'Android' + 'Chrome/[.0-9]* Mobile' -
Tablet pattern:
'Android' + 'Chrome/[.0-9]* (?!Mobile)'
Chrome for iOS
The UA in Chrome for iOS is the same as the Mobile Safari user agent, with CriOS/<chromerevision> instead of Version/<versionnum>.
Hereof the Chrome UA on iPhone:
<5.0 (iPhone; CPU iPhone OS 10_3 like Mac OS X) AppleWebKit/602.1.50 (KHTML, like Gecko) CriOS/56.0.2924.75 Mobile/14E5239e Safari/602.1
For comparison, the Mobile Safari UA:
Mozilla/5.0 (iPhone; CPU iPhone OS 10_3 like Mac OS X) AppleWebKit/603.1.23 (KHTML, like Gecko) Version/10.0 Mobile/14E5239e Safari/602.1
When the Request Desktop Site feature is enabled, the Desktop Safari UA is sent:
Mozilla/5.0 (Macintosh; Intel Mac OS X 10_10_4) AppleWebKit/600.7.12 (KHTML, like Gecko) Version/8.0.7 Safari/600.7.12
WebView on Android
The Android 4.4 (KitKat) Chromium-based WebView adds Chrome/_version_ to the user agent string.
Old WebView UA:
Mozilla/5.0 (Linux; U; Android 4.1.1; en-gb; Build/KLP) AppleWebKit/534.30 (KHTML, like Gecko) Version/4.0 Safari/534.30
WebView UA in KitKat to Lollipop
Mozilla/5.0 (Linux; Android 4.4; Nexus 5 Build/_BuildID_) AppleWebKit/537.36 (KHTML, like Gecko) Version/4.0 Chrome/30.0.0.0 Mobile Safari/537.36
If you’re attempting to differentiate between the WebView and Chrome for Android, you should look for the presence of the Version/_X.X_ string in the WebView user-agent string. Don’t rely on the specific Chrome version number (for example, 30.0.0.0) as the version numbers changes with each release.
WebView UA in Lollipop and Above
In the newer versions of WebView, you can differentiate the WebView by looking for the wv field as highlighted below.
Mozilla/5.0 (Linux; Android 5.1.1; Nexus 5 Build/LMY48B; wv) AppleWebKit/537.36 (KHTML, like Gecko) Version/4.0 Chrome/43.0.2357.65 Mobile Safari/537.36
The user agent of a web browser is a string value which identifies that browser and provides certain system details to servers hosting the websites you visit. Changing the user agent string can be useful in certain scenarios when some web site’s functionality is locked down to the specific platform and you need to bypass the restriction. It’s not required to mention that changing the user agent can be useful for web developers. Let’s see how it can be done in the popular web browser Google Chrome.
RECOMMENDED: Click here to fix Windows errors and optimize system performance
Traditionally, the user agent string is used by web developers to optimize their web apps for different devices. This allows developers to differentiate various device classes like tablets, phones, Desktop PCs and laptops, and more. The user agent string can provide web servers some details about the user’s operating system, and the browser version.
Google Chrome is the most popular web browser which exists for all major platforms like Windows, Android and Linux. It comes with a powerful rendering engine which supports all modern web standards.
To change User Agent in Google Chrome, do the following.
- Open Google Chrome.
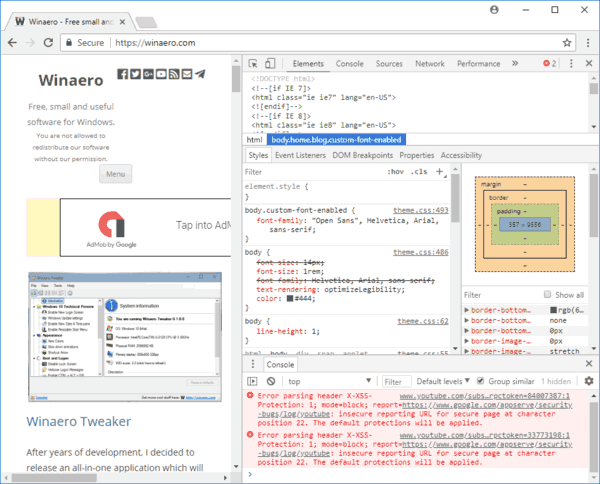
- Press the Ctrl + Shift + I keys to open its Developer Tools.
- In Developer Tools, click on the menu button with three vertical dots.
- In the menu, choose More tools — Network conditions.
- Go to the Network conditions tab and disable the option Select automatically.
- Click on the Custom list and choose the desired browser to emulate. Alternatively, you can enter a custom user agent value using the text box below the list.
The list includes various versions of Internet Explorer, Edge, Opera, Safari, Firefox, and Chrome. Also, you can choose between Desktop and Mobile versions of the browsers.
Tip: If you are switching the user agent in Google Chrome frequently, you can save a lot of time and use the following extension:
User-Agent Switcher for Google Chrome
It will allow you to switch the user agent string with a couple of clicks.
Using the built-in Developer Tools option, you can change the user agent in Google Chrome any time.
Related articles:
RECOMMENDED: Click here to fix Windows errors and optimize system performance
Используемые источники:
- https://alpinefile.ru/change-user-agent-browser-yandex-chrome.html
- https://developers.chrome.com/multidevice/user-agent
- https://winaero.com/blog/change-user-agent-chrome/

 8 лучших браузеров для компьютера
 Топ-10 браузеров на 2019 год: новые тренды...

 Браузер для слабого нетбука какой лучше выбрать для Windows XP 7 10?
 Какой браузер для Windows 7/8/10 лучше и почему
 Использование новых NVMe SSD в качестве загрузочного диска на старых системах с Legacy BIOS (для любой ОС)
 Владельцы абсолютно всех Android-смартфонов смогут запустить Windows 10